 From the data it gets from the
 There are FIVE ways of interfacing with the program:This guide concentrates on V1.30 and V2.05: how to use the Menus, along with keyboard switches (TABLES OF KEYBOARD SWITCHES) - but you may find yourself using mixed methods in the end; the Config. File (Astrolog32's customisable defaults page) gets an extensive section (CUSTOMISING DEFAULTS via CONFIG. FILE); the other ways have their own sections - a how-to (SWITCHES & MACROS), along with (LIST of COMMANDS) ~ find all these in TOPICS MENU below.
1. THE MENU BUTTON-BAR { menubar above the window - to edit, save, alter what's delivered: many settings can be altered for good here if wished }
2. KEYBOARD SWITCHES { faster program directing-method - edits, saves, and alters what's delivered, mainly for current session }
3. COMMAND LINE SWITCHES, { swiftly setting up different session, charting or printing options }
4. SET-UP OF DEFAULTS inastrolog32.dat , the Config. file, which maintains initial, ultimately personal, permanent preferences.
5. MACROS, { to run a batch of actions to alter the chart or print-run: you can create them, and are increasingly an option for beginners. }
(...hey, that's a lot! - but it's just, they are available!)

ASTROLOG32 is modular, served out of several auxiliary folders, all independent of each other: V1.3x releases of Astrolog sadly don't include much auxiliary content in them, though you can make a chart, or work with any chart in your
\charts folder, and create charts at places local to you, - or further afield by using locational co-ordinates found online. It's left up to you to add.se1 files, from Astro.com, or.atl files from Southville.net, if you feel the need for them.
But adding the Atlases or Ephemerides adds speedy input and chart-accuracy - any needed additional content can be downloaded item-by-item from the zipfile repositories of Astro.com and Southville.net, then unzipped into Astrolog32's internal folders - (or indeed expanded folders can be copy/pasted into it from another person's installation).
A full folder-tree looks like the image to right..
With all the Atlases incorporated, you'll seldom need to Google for any place's co-ordinates (getting atlases); and with all additional Ephemeris files incorporated, you can chart back to 12000BCE! - which is overkill (getting Swiss ephemerides).
So Good News, in the V2.02+ releases, appropriate atlas files are included to suit the language you select, ephemerides and an uninstaller are included, so no compiling!
Regarding the best location for your Astrolog32, - well, with V.1.30, only old-hands will know the path re-writes necessary to install it in 'Program Files', so newbies should unzip it to C:\astrolog32 (see 'YOUR DEFAULT DIRECTORIES for FOLDERS' in 'CUSTOMIZING DEFAULTS'), - while with V2.0x, convenience may as well be your guide, - with any V2.0+ installation, 'Program Files' is now the first offered location, but any sane path you then browse to or type in will be accepted ~ Windows© doesn't care if programs run from 'My Documents', or even from a USB drive, (see ASTROLOG32 ON A MEMORY STICK).
IMPORTANT: Wherever you install to, Windows© won't let you alter or add to Astrolog folders and files at all if you install as Administrator, but then try launching Astrolog32 as 'User'; install under your 'user' profile, with any NTFS Windows© release: avoid Vista's securitisation issues at all costs.
Unless you are keen to use V2.0x's New Macros, choosing 'C:\Program Files' for V2 releases is OK; and better than 'My Docs' - for one reason, see here; and for another, programs are safer there from accidental mismanagement; But read INSTALLING first!
Changing your settings: The default settings (colour, size, house system, location etc) define what you get at launch; immediately your session has begun, you can change these, on a per-session basis through the menus or switches, and the changes you make will stay for the whole of the live session, for all subsequent charts unless you un-make those changes, - but the defaults will re-appear at re-launch.
However, if you save the Config.file (astrolog32.dat ) anytime after your changes via menus or using switches, you'll find many - not all - alterations then become your new set-up, after a re-launch. See Saving your set-up (linked also in Menu below).--------------------- ---------------------
BEFORE YOU DIVE IN: Two things you should know:
When charting in a different time-zone to your own, Astrolog has an enduring quirk, that it needs a minus before an easting of hours, viz: minus seven, -7, to hop from Chicago Time to Paris; and a plus (or nothing) before a westing of hours, viz: plus seven, +7, 7, to hop from Paris Time to Chicago.
 TOPICS MENU
|
|
|
|
|
Open your Astrolog32 by clicking its shortcut .. |


Astrolog32 displays a chart after you've browsed to its file after clicking [File] > [Open Main Chart], or keyboard-switch Alt+o, - you'll see the Charts folder-window, like the image at right; or you can go [File] > [Open Chart #2], or Alt+shift+O, to load chart #2. NOTE: Those two different keyboard shortcuts aren't Alt+zero! that's Alt+O for orange!
...navigate through the folder offered to the chart you want, and go 'Open'.
If it's [File] > [Open Main Chart] you went, chartxxx.dat will load on your screen: but going [File] > [Open Chart #2], it'll load but it won't be seen - in order to see it, go shift+X to swap charts.
(For charts #3, #4, it's menu or command-line only to load them, and they too remain invisible unless called to a multiwheel).
 Any charts in your Unless you have unzipped the Celebs' Charts into your Astrolog's chartfiles are not locked, though they may be set 'Read Only'; so any If you are not using a mouse, file-opening is best done using ANOTHER WAY #2 or #4 (see below).
ANOTHER WAY #1: Charts in batches can be opened in a series, through using Astrolog32's [File] > [Search charts] engine: they will picked out by some common factor or factors, see 'Search Charts'.
After putting in the parameters you want shared throughout the batch, and clicking 'Search', they can all be reviewed, one after the other alphabetically, or pick one out, to view: single charts can be hunted too, by name - but remember, Astrolog searches the 'hidden' names (see Naming files), not the Windows© names.--------------------- --------------------
ANOTHER WAY #2: where you can remember a filename, it may be opened quicker by Astrolog32 command-line: typing-i (space)filename.dat will raisefilename.dat - use upper or lower case spellings - doesn't matter! but it's only the top folder specified in the path to\charts inastrolog32.dat , which will be searched, not sub-folders. See ABOUT SWITCHES.--------------------- --------------------
ANOTHER WAY #3: keep frequently-used chart-data available in Notepad, Excel, or Wordpad! The/qb lines from in any.dat files you have may be highlighted-and-copied (go Ctrl+c to copy), then pasted in some text-file (likemy-regulars.TXT ), or other prog (likemy-qbs.XLS ), - put each entry on a different line, (adding a semi-colon, then the native's name, before adding the next entry); - like this:
/qb 5 12 1928 12:00:00 ST +6:00 94:34'43W 39:05'00N; Bacharach, Burt ...
/qb 9 29 1907 12:00:00 ST +6:00 96:55'06W 33:28'00N; Autry, Gene
- then, when any entire line is highlighted-and-copied, and then pasted into the Astrolog32 command-line (see ABOUT SWITCHES), it is executed & the chart displayed, - only without the chart-name, - when you press Enter key. Try It - check out Burt Bacharach, for instance..
This is a very compact way of hoarding the charts which you've made already, then quickly loading data to one, or multiple, launchings of Astrolog32.--------------------- --------------------
ANOTHER WAY #4: keep key chart-data available in macros! New-style V2.04+ releases can, with the MACRO folder 'on', call charts from some of the F-keys - see New Macros; old macros too can call up charts, - see Standard Macros.
 For going to print, click here; to paste-up an image, click here; to save, click here; to make a new chart, click here.
So, Astrolog has a reputation for being rather like a maze: this comes out of being originally text-only; the chartwheel and other graphics you see are an add-on! - sometimes when pressing ' v' to swap from one to the other, we find there's no relation between text and the graphics, or not at first sight.
Remember, text remains priority, and the text version reveals the program-status you have called up.
The graphic displayed (when seeing text, and hitting ' v') may just be for-want-of-something-more-appropriate.
To identify the chart's glyphs, see here. To identify the aspect-glyphs, see here.
Data-build-up from Astrolog's fund of calculations has no related page-maker ( but this Companion as one! - using RichTextFormat - click here to open it, only if viewing in IE7 or IE8).
- - - - - - - - - - - - - -
For a more DTP approach, use © MSWord. Either way:
- individual text pages can be copied for pasting, going
[Edit] > [Copy Chart as Text], or Ctrl+shift+5, (watch Astrolog32 flip into text!) ..
- while the graphics window, e.g. the chart, can be copied for pasting, going
[Edit] > [Copy Chart as Bitmap], or Ctrl+shift+6, (watch Astrolog32 flip into graphics!), .. and pasting the image into some MS Paint, text editor or other program.
- - - - - - - - - - - - - -
3 TIPS FOR PROGRAM & CLIPBOARD MANAGEMENT
COPY HIGHLIGHTED TEXT
Hold down Control ~
Hit c
SWAP BETWEEN
TEXT & GRAPHICS
Hit the 'v' key!
PASTE COPIED TEXT
Hold down Control ~
Hit v
These keyboard-switches are essential, to deal with address-lines, command-line, text-snippets, and image-transfers: also pasting in from LIST of COMMANDS, or pasting file-paths into the Search dialog, (which see below). Example use, watch green animated illustration here.
- - - - - - - - - - - - - -
Looking to get into keyboard switches?.. click here, here and here for three of the most essential ones, and look up KEYBOARD SWITCHES for the rest.
Optional Tip: Make a link to your\Charts folder! - put a shortcut in the Start Menu, so you can manage your folders as you go.DODGE No. 1
For the practised user - fed up with rootling about in your file-system? If you want quick access to one, or several, of the folders nested in Astrolog (e.g. 'charts\personal', 'main', 'atlas\american'), and/or to relevant docs, then create a 'Management Center' or 'Console' folder (on your Desktop or in Program Files for instance).. Leave the folder and create a shortcut to it - put the shortcut in QuickLaunch.
Here's how: First, create & name a new folder (say) in Program Files, 'A32_RECEPTION_DESK'.
Populate it with:
- link to
\charts folder- snippets and photos
- a copy of the Helpfile
- link to
\Miscellaneous folder- a shortcut to the Config.file,
astrolog32.dat - You should put a link to the program
astrolog32.exe itself here, too: see how.
Now you can fire up or modify Astrolog, inspect, corral, and load files-to-view, and handle the\charts folder, from one place!
If you have charts in theAstrolog32's 'Search Charts' filter\charts folder, your program will open them when you go [File] > [Open mainchart], or [File] > [Open chart 2], both options offering a folder-view (as explained above), - though there is no constraint on you hunting them down, to open & edit them in Notepad, from your\charts folder open in Windows Explorer! ~ this is why a shortcut to your\charts folder is important! ~ to delete your charts, this is the only safe & practical way!
If you have text-files saved from your work, just skip opening the Astrolog32 program, use Windows Explorer, navigate to\miscellaneous and open them in the program of your preference: these would include aspect-lists, interpretations, help-lists, positions..Filename searches, using 'Windows Explorer':
Given that you just want to find a chart by its filename, your operating system's Search-within-Folder is more versatile than Astrolog32's, in as much as you can switch to a different path, and a different folder, more quickly, if you draw a blank.
But then your options for getting it onscreen are three: you can, first, raise the chart by copying its/qb line into Astrolog's command line, then click 'Run'; to navigate again, but using Astrolog32's [File] > [Open Main Chart], is a second option; or thirdly, go the swish route of modding Astrolog32 so that files open in the program simply with a double click, as they do in Astrolog 6.30 - see DODGE No. 7 for how.
[File] > [Search Charts] is a small but still very useful set of filters, selecting up to five definers for a search of the charts:
- any part of the filename
- any one luminary, planet or any object, filtered by Zodiacal sign, so if you remember the Sun sign, but not the name, you can filter for that
- particular aspect between any two luminaries, planets, (& Nodes, Uranians, East or West Point, if you have them on)
- one luminary, planet or any object filtered by its House
- one luminary, planet or any object in a chosen Gauquelin sector

'Alt+s' is the keyboard switch to call this Search feature.Note 1. there is no filter for year - unless you inserted the year in the file-name when you saved it; then you could put it in the 'search for'...'in name' field.When the hourglass vanishes, any results appearing in the box on the right can be opened with a double-click, or you can flip through the series, starting with the first alphabetically, by clicking the 'OK' button, then going Ctrl+n to go on to the next.
Note 2. Any folder can be searched, not just\charts .
Note 3. If you click 'Search', with 'subfolders' ticked, but none of the filter-lines, 'Search charts' will supply all the charts in your selected folder, in alphabetical order.
Charts raised can be progressed/regressed with the 'p' switch, or otherwise modified, and then re-saved. ~ you can then move on to the next, or back to the previous of the listed charts, if you want to, or even interrupt your search to make a new chart, and then pick up the searched returns again.
To go to the next / go back:
exclusively when you have called a search up, the menu-options [File] > [Open next chart] (Ctrl+n) and [File] > [Open previous chart] (Ctrl+r) will work one-by-one through your searched charts in sequence, to the first, or last, of the list that [File] > [Search charts] has provided.
NOTE: Look out for three catches:
EXAMPLE: 'Who, in my 'charts' folder, has Uranus at the Vertex?'
Go [Settings]> [Object Selections], and make sure that Uranus (in 'Planets'), and 'Vertex' (in 'Points') are ticked..
Open [File] > [Search] - If you have a filter for timed charts, put that in a Search field;
In the middle line of drop-downs of the five, click the tickbox, and Select [Uranus], then [conjunct], then [Vertex]; Click [Search] Aha! John Galsworthy..
DODGE No. 2
Readme.HTML which up to Version 2.04 you'll find in\main , normally opens from a link in [Help]. After unticking the 'read only' attribute in its file properties, I opened it in Notepad, and added there the paths to various\charts subfolders, inserting them after the final 'DISCLAIMER' paragraph.
Insert '<br><br>' (without the quote marks), at the start of each line.
As well, you can put there a command-switch, or several, or an interesting snippet from the Helpfile.
SaveReadme.HTML .Readme.HTML opens in your browser, and then, you only need to highlight and copy a path from the Readme file, and paste it into the 'Search Directory' address field; or, highlight and Ctrl+C a switch you like, and paste into the command-line, and things go with a whizz! - see also Dodge No. 5, which expands on what you can put in this document.
In Astrolog32, there are file-names saved within the file-content, and file-names that you save with, into the\charts folder; often the two end up the same, but they don't have to be, and they can serve different functions.
Any searches for any part of a name which you typed only in the 'Edit' dialog Name-field will only be found in an Astrolog32 Search (see Search Charts Filter). But as for a search with Windows© "Search For Files and Folders", - such data is within the file, and Windows© will not search within.dat files as if they were text; with Windows©, only the [File] > [Save Mainchart data] names, that is the saving filenames, which will be searched for and found.
Let's call these two the 'saving' name and the 'hidden' name.
For this reason, the name which you save a chart by (as opposed to the 'hidden' name from the 'Edit' dialog), should be the one which holds any key information for a Windows© search: e.g.
Doe,John_1865_family,horse doctor,Ohio,unrect.dat
On the other hand, long file-names may not be accepted in folders written to CD-Rom.
NOTE: the following, Astrolog32's [File] > [Search Charts..] module only inspects the 'hidden' names. As, after rummaging through the Naming & saving are two opportunities to bundle information connected with the chart
- first, when giving your chart its 'hidden' name during chart-editing: you can save as many as 255 characters/spaces in the name Astrolog32 shows in the Name field - any more, and you will see, on reopening, a error notice 'Passed out of range switch "/zi" ', or 'the command info file is not in any valid format (character 255) ', or 'Value 0 passed to switch /M out of range. ', (or, the files may end up broken!). ..and a down side is, long 'hidden' file-names look absurd when incorporated into Valja's alternative-interpretation readings.
- secondly, you can save more data by choosing to type in different information, when it comes to saving into the\charts folder. Windows© has a different allowance - it will allow 140 characters maximum - but it depends on the length of the full address path to your\charts folder whether it displays correctly: if it's as long as the path to\My Documents , the names may be foreshortened, like thisSHORTE~1.DAT. .
And for this reason, I don't keep my\charts in My Documents.
[Edit] > [Edit Main chart data ..] pulls up the dialog needed to make a new chart, modifying the 'Here-and-Now' data seen at your launch.
Equally, it's the same dialog-box you need, to re-edit the chart in front of you in order to rectify it, or enter data for another.
It may be you need not type anything in: to raise a chart for the present moment, just click 'Here & Now'; to call back a chart you sent to the 'Astrolog clipboard', click 'Recall Data from memory'. & click OK.
Each field needs a typing-in, or the drop-down of a pick-list: after the ten fields (see right) are filled in, and 'OK' is clicked, this will be the datum that Astrolog32 retains as The Radical, to show, to save, to deliver all the other viewable options for your new Mainchart.
The keyboard shortcut to edit the current chart, or create a new chart, is Alt+z.
You only need to type the first three letters of the month in the first field, and after that, the 'tab' key carries you through the fields in order. At 'Time', 'Daylight Saving' and 'TimeZone', the down arrow-key spins through the options; or you can put these three fields in manually - it's maybe quicker.
After selecting the timezone, click 'Call Atlas' for giving Astrolog32 the location, (about, see THE ATLASES); then, location and co-ordinates are automatically filled in, (though you can insert them manually).
Click OK!
This new 'Main Chart' you see is on chart-thread #1, - this is the principal working chart-thread, seen, and doing the bulk of the work where there's no call for accompanying charts in Relationship Mode, and as well, the only one that can be copied or saved.
At this stage it's time to verify, and maybe proceed to saving the chart.
When you fill [Edit Mainchart Data] again, and 'OK' new input, then the first Mainchart data will be dumped; whatever data-fields you don't change will carry over - so, unless you are careful, data from the previous chart you may find unmodified, in the new chart!!
~ And all the other chart-threads are editted similarly, ~ overwriting the data found in their respective "Edit Chart" box
Bear in mind that, where you don't modify the name-field during a new data-input, saving will perhaps overwrite a prior chart's name on your new chart! In your charts, the time, timezone and global co-ordinates don't even have to correspond for a chart to appear - Astrolog doesn't know better than you! The sinking Titanic was timed in GMT, and as long as the given time and timezone match, that secures the instant in time - the location (mid-Atlantic in that case) is meanwhile derived from the co-ordinates. For a breakdown of the TimeZones available in the drop-down, and of the way you can insert a manual or preset correction from your local time, seek out ASTROLOG32'S STOCK ZONES. No matter how big the ephemeris you got is, the drop-down for years in the 'Year' field will only offer the years from 1920 onwards, to click on; for any other years, they must be typed in. With V2.0x, one of the super-accurate 'Sweph' file-sets is installed by default, but it covers only the years 1800 to 2399 CE. For BCE, put a minus before the year (and see The B.C.E. Correction). Astrolog automatically uses the Julian calendar for dates before October 15, 1582, and automatically uses the Gregorian calendar for dates after October 4, 1582 - the 5th to the 14th inclusive were skipped in 1582 - if you input any of the omitted days, Astrolog32 will assume you want Julian calendar. For going to print, click here; to paste-up an image, click here; to save, click here.Opening [File] > [Save Main Chart data] is the menu-path for saving the Main chart as a.dat file (the keyboard switch Alt+w opens the same dialog window) - these.dat files are Astrolog's standard format for saving and view.
Going [File] > [Save Chart Positions] is the menu-path to saving the Main chart as a_pos.dat file (the keyboard switch Alt+shift+w opens the same dialog window). These also are.dat files and Astrolog's alternative format for saving and view (why, see here).
By default, these all save to\charts folder.
The - - - - - - - - - - - - - - - - - - - - - - - - - -
Apart from.dat file saving, there's [File] > ([Export to] >) [Save chart as Textfile], and [Save chart as Bitmap], to save chart-data as a.txt (textfile) or in image media formats, using the appropriate program (Notepad, Paint) to retrieve and open them subsequently.
By default, these save to\miscellaneous folder.With a Save chart as text save, the@0102 header in the file is absent: it's just a list of positions as text, saved to\miscellaneous by default - you can publish the object-positions in Word, Wordpad, or Notepad. (BTW, this save will bounce Astrolog into text-mode).
An advantage of this data-only format is, that the text's contents are searchable via Windows© Search.
An image-save is tidier than a screenshot, (see below: APPEARANCE & IMAGING); and [Save chart as bitmap] will send the captured chart to \miscellaneous ; but, being a.BMP file, a chart will take 200kb, and probably more unless you shrink the Astrolog window using the window pullhandle beforehand - a reason, then, to prefer to choose [Edit] > [Copy chart as bitmap], paste it in an image-editor, and save it as a smaller file-type.--------------------- --------------------

NOTE: as long as the file starts with@0102 and is in the unique layout as shown in the section below, Astrolog32 will open it as a chart even were you to save it with the suffix.txt ; and other file-suffixes will be accepted, if they're other text-file formats, but you must remember to pick 'All files' in the 'files-of-type' field, for Astrolog32 to browse them if they're in your\charts folder....
The program's software is designed around translating letters into charts, so these
.dat files are just text-files that drive chart-creation in Astrolog32.
Here's an example, as seen in Notepad (panel to right).
This is an older (Astrolog 5.40) chartfile, with letterspaces in blue. These are Astrolog32-compatible, as are Astrolog 6's .as files.
Saving from Astrolog32, there are another three lines put in, the middle line being a prompt for when you edit your charts in Notepad, to use American format dates:
@0102 tells the program it's a valid chart.
third line is an advice line, as it follows a ";".
The fifth and sixth lines have the data: in/qb , ST is standard time, DT tells Astrolog to take off the hour added.
After/zi, "internal name-data" "placename" follow.
No matter what you restrict from view, when viewing, saving or printing, any Getting to other targetted folders: With [File] > [Save chart as Textfile..] or Ctrl+5, and [File] > [Save chart as Bitmap..] or Ctrl+6, both open a dialog box with the default destination DODGE No.3
If you want to bundle a lot of text with a chart you have already made, a quick way is to go [Open] > [Open Mainchart] and locate the chart; right-click on it and force Windows© to open it in Notepad, (or Word if pictures are to be incorporated): then proceed to open the chart normally in Astrolog, (this for safety's sake.)
Now, in your text editor, delete the text-version's contents, and paste in your gathered-up notes and pictures, saving with the same name, but as .txt or .doc., in the same folder.
The data you keyed in to the Mainchart can almost always be saved, whatever window you are at. So, if you find yourself lost in some window option, you haven't lost your chart-data .. just go [File] > [Save Main chart data], or Alt+w. The exception is, where you have progressed or regressed the chart, the data you started with is lost. The image of the chart or Aspectarian that gets saved there is of a size equivalent to what's onscreen, so resizing the Astrolog window resizes the image.. While another native file-format, ( Astrolog32 is liberal in accepting other file suffixes too: name your chart " Astrolog signals any error in the naming by refusing to save, and not displaying other charts in the destination folder: Windows© baulks at odd characters in the filename, which may be there even if you can't see them: as, for instance, if you paste in a name from a .doc or .rtf, which may include hidden formatting instructions (even line-breaks!).[File] > [Save Chart Positions] sets up the save as a_pos.dat , which, like.dats , save by default to the\charts folder.
This is Astrolog's other format, for saving charts that are less simple, viz:The letters
- A composite chart
- An harmonic chart
- A multichart
- A progressed chart
- A midpoint chart
- A Kensky flipped chart
- .. and others
@0203 tell the program it's a valid chart.
When accessed using Notepad, these 'Chart Positions' lists declare no time, and no co-ordinates, but they detail the positions of every planet, Luminary and Point that is normally listed in the info sidebar; also they do not itemise what kind of derived chart it actually is! which made you select a_pos.dat rather than a.dat - so you must stipulate, in the file-name, all useful source-data, and the tweak(s) that made you choose_pos.dats as a solution, e.g:
COMPOSITE_Felix(prog.)&Ludmila(prog.)_pos.dat
or,
FOURTH_Harmonic_Elise_pos.dat
Re-opened in Astrolog32,_pos.dats that host multiwheels must be reset to the appropriate number of charts, (i.e. Relationship Mode ON), to see the full multiwheel, so be sure to indicate in the file-name the number of charts incorporated, for example:
4CHARTS-Sonia-William-Jasmine-Leo_pos.dat .
A It's your choice whether to save as a You may find a.dat chart-file which won't open; I mean those which show up as files which can't be deleted, nor can they be modified even in Notepad.
For these, you must highlight all files in the relevant folder, then de-select the broken file concerned; now cut the rest and put them all elsewhere. Now delete the folder.
This is the first switch to learn: switching to text is most simply done by typing ' v' (without quote marks) at the keyboard, though there's the menu option [View] > [text mode] as well.
This 'v' is a toggle, and will switch you out of whatever graphical window you have, to a version as text, or, out of some of the text mode pages back to the nearest graphical option - map, aspectarian or chart. (If ' v' doesn't go all the way, then go shift+V, or Alt+shift+V, then ' v' again, should get you back to the chart.)
Image to left shows the text-mode for [Charts] > [House Wheel].
By default, you will see the [Standard Wheel], - see right.

Astrolog32 provides far more data by way of text pages than graphically, so you sooner or later find, when you come to need or print some non-default data, that the use of switches, maybe macros, becomes key to getting work out; (that said, I got along for a decade without switches).
Text-mode differs from the graphical chart's data in one important way, the harmonic status is not given onscreen; nor is the Julian Day.
Whatever you call up, shift+V is the usual switch to revert to your main chart datum: the exceptions being:
- no harmonic settings are reverted; for these, it's easy to use command-line (see end of MACROS & HARMONICS).
- The following groups of command switches:
'Switches which affect how a chart is computed' ~ (see LIST of COMMANDS).
'Switches which affect how the chart parameters are obtained' ~ (see LIST of COMMANDS).
All the data-pages accessed by the [Lists] menu are texts, as well.
Custom lists of data can be raised, appended each to another and viewed, exported, or printed off in a single run, by using the command switches (which you can copy-paste from the LIST of COMMANDS daughter-page of this guide, into the command-line), or by using macros. See examples of both there.
If you have 'colored text' switched off, colour can make text-lists easier to search through for a particular aspect or object: the keyboard switch is alt + k, a toggle.
To see what text Astrolog32 can give you by default for a single chart, to view or then print, go [Run] > [Open command line], type -e, press Return key. (Press shift + V, to revert to the core data).
EASY EXAMPLE: to add Objects' angles to Local Horizon, and add Parts, set the following
[View] > [text-mode]
[View] > [monochrome] ..optionally set background to white, text black
[Settings] > [Object Selections] optionally select the planets/points you want
[Run] > [Open command line], & enter this command/Z
and Go 'OK'.. the data will be added to the positions already on view.
...enter this command/P
and Go 'OK', Arabic Parts' positions appear.
To switch them off again, enter_P _Z & press Enter;
...or just go shift + V, to revert to the core data.
TOUGH EXAMPLE : to print off an ephemeris, set the following
[View] > [text-mode]
[View] > [monochrome] ..optionally set background to white, text black
[View] > [Print nearest second], if you want high accuracy
[Settings] > [Object Selections] select the planets/points you want.[Run] > [Open command line], & enter one of the following commands
-E , for current month ~ according to the chart you have up..-Ey , for current year ~ according to the chart you have up..-Ey n , where n is the year/ span of years you want ~ I can't make this switch work..-qy n , for year n, year starting on Jan. first-qm m n , for year n, year starting on month m ~ e.g. 2 for Feb, 3 for Mar, etc..

Optionally add, after a letter-spaceIn V2.0x, use [File] > [Export] to save the data.Press Return key.
-sr , data in Right Ascension, rather than ecliptic longitude-gp , data in equatorial declination, in the grid of aspects-ap , data in equatorial declination, in the grid of parallel aspects
In V1.3x, when you have the lists you want, press the Return key again;
- Type '
/o YourChosenName.txt ' in the command line.., and go 'OK', or press the Return key again.
The file will be created and sent to your\main folder
Your text, retrieved and opened in Wordpad, can now be editted to ensure the font is small enough for each day's data will print all on one line, then printed.
For Print Setup, the keyboard switch is Ctrl+q; for printing, it's Ctrl+p. With Ctrl+2, Ctrl+3, Ctrl+4, you can increase the font size to readable. Similar short commands will raise and dispatch charts in a swift fashion. See ABOUT SWITCHES, and the LIST of COMMANDS page.
If your clock-time advances during summertime, you may well consider it worthwhile to change Astrolog32 to be one hour ahead, as the clocks are. If the charts you make are usually close to the present date as well as confined to your DST zone, as in Europe & U.S., - then toggle the little 'Summertime' switch you'll find in [Edit] > [Set Default Location, Timezone..] (Alt+shift+D opens the same dialog) .. your keyboard's 'down' arrow does this switch; OK it then go [Edit] > [Edit configuration file], and Save it.
DST will then be applied to all charts after you re-launch, and in the [Edit] > [Edit Main Chart] and [Edit] > [Edit Chart #x] Summer-Time fields, it will show 'Yes', and Astrolog sets the charts for an hour earlier than your time-datum.
Otherwise, Astrolog32 remains on your Standard Time.
There is going to be no prompt to reset DST at summer-time's start or end, - Astrolog32 is very manual! -
set yourself a pc-diary or e-mail alert now, for when Summer-Time ends or starts.
DODGE No. 4
If you make worldwide charts as well as domestic and 'Here & Now's, you could deploy two Astrolog32 installations, one for current events during your DST summer, but the other permanently at your standard time; my two versions have to look quite different, so I know which Astrolog version I'm in. To do this yourself, see the very last article here.

Seen when in 'graphic' mode, this is the vertical panel on the right of the chartwheel, detailing planets' and cusp positions. It cannot be moved, but it can be hidden.
[View] > [Show chart info] (little t, a toggle) has various effects: it hides the sidebar, while also hiding the chart-data subscript at the bottom of the non-chartwheel graphics. It calls graphics mode, if you're in text mode. And it makes the chart oblong!
as does [View] > [Show info sidebar], Alt+t..
..you will need to follow either of these toggles with shift+Q, to make the chart-wheel square again. Otherwise this view will print oblong - another reason to follow up with shift+Q. Alt+t is the Hide-Info-Sidebar-&-Show-Data-Subscript toggle.
To see chart-data progressed from the start-time, here are two routes that Astrolog will compute for you. The first route offers more options as to the exact lapse of time for reckoning one 'day'.
[Charts] > [Progressed (Single Wheel)] opens a dialog box so that you can put in the time-data to progress to; then Astrolog will re-make the Mainchart so that the planets, houses and points are progressed according to the formula chosen in the dialog box, (Settings), - by default, 'day-for-a-year' up to 'Here & Now'. Note: there is a little tickbox top left ('Do Progression') in the 'Progressions' dialog box, - this must be ticked.Getting out of your progressed chart to the Radical again: open the 'Progressions' dialog box again - where you'll see the data you entered is still resident - uncheck the 'Do Progression' tickbox and 'OK' it.
- The second choice is 'custom' - you choose the day-length per year lapsed, then years and parts thereof will be calculated pro-rata.
- The third choice is Solar Arc Directions: a 'mean' day is reckoned for each year lapsed, and the chart progressed by such days or parts thereof.
- The first choice progresses by gearing each year (month, etc) lapsed to the actual day-lengths (hour-lengths, etc) succeeding the natum.
But for this method, which is default, 'Progressed & Natal' does a similar thing and, to my eye, offers more visual cues as to upcoming aspects-by-progression.
This progressed chart does not disclose the 'day/hour equivalent' from the natum, for the year/month/day/hour progressed to.
If you open a new Mainchart, it too will be progressed to the same point in time, unless you kill the progression, by going [Charts] > [Progressed (single wheel)], or Alt+shift+P, and un-ticking the 'Do Progression' box.
If you exchange Chart #1 and Chart #2, at this point, the progression will be dumped.
If you bring in Chart #2 (e.g. 'Comparison Chart'), the progression will be dumped. Progression via [Progressed (Single Wheel)] will prevent any further progression using 'p' switch.-----------------------------------------
[Charts] > [Progressed and Natal], Alt+shift+N: this creates a bi-wheel, setting the progression to the date of chart #2, using secondary progression/regression. It only requires that you set up chart #2 appropriately and go Alt+shift+N.
Note: On the setup in V2.05, the trans-Saturnian outer planets are restricted in Chart#2... a tidier display, but.. you have then to remember they are thereabouts. Find advice on regressing the chart at 'Astrolog_List' group - (about, see elsewhere here).
To escape the bi-wheel, use 'c' without the quotes.
If you prefer command-line, To make sure you pick the kind of progession you want, see --------------------- --------------------
Other Way Round?: If you see a pending aspect-by-progression in the natal chart, and want to reckon the actual year/month when the effect is actualised, Astrolog can't help, and so it's still a pen-and-paper job, though once you have noted days, hours and minutes from the birth-time, Animation will hop through the equivalent years, fortnights and six-hour intervals; just count each click of the animation, using different jump rates.
These progressions will not be dumped in dual- or in multicharts.
PROGRESSION by ANIMATION: Progression-by-Animation works just as well in all text mode charts, and in Local Horizon, maps and Dispositor pages as well: these all offer ways of scanning for an exact time or event, and the graphics are good illustrations of the night sky over time.As well as being presented at launch, 'Here and Now' chart can be called up at any time simply with an 'n' (without quote marks) at the keyboard, or alternatively use the [Charts] > [Here and Now] link, or the [Edit] > [Enter/Edit mainchart..] dialog box link... handy, so long as your pc's time and date are correct.'Here & Now' is automatically loaded to all chart-threads (Main, #2, #3, and #4) at launch, remaining till you edit them.
'Here & Now' clears all fields to default including the DST field but excepting the Name field (this remains unaltered).
As well as just pointing to a narrative for the day at hand, 'Here & Now' can come in useful, by using it in a synastry chart (i.e. with the/r command switch, /rmychartname.dat now' will compute today's transits for filemychartname.dat ) to display today's planets in my own houses. This is easy: launch Astrolog32, set your own chart as Mainchart, and click [Charts] > [Synastry].
Press 'c' to revert to a single chart-wheel.
Using chart #2's default 'Here & Now' also serves for making a comparison chart (go Alt+c), which ends up showing today's transits around the Mainchart, and is a very useful switch.
Press 'c' to revert to a single chart-wheel.

Loading or entering data for Chart #2 you use similar dialog procedures as the Mainchart, - it's [File] > [Open chart #2] or [Edit] > [Enter/Edit chart #2]; switches, Alt+shift+O, Alt+shift+Z, respectively. After 'OK'ing your data, Chart #2 is created and lurks out of sight - Chart #1 is still visible, and Chart #2 will only appear by selecting the bi- (Alt+c), or Multi-wheel.
To inspect it then by itself, there's this valuable option only:
Chart #2 data can be viewed or copied or printed just by itself by making it the Main chart! - transfer it by going [Edit] > [Exchange main chart and #2], and then, now as Mainchart, you can pursue all options with it. (Quicker, go 'Shift+X' to swap them).
This 'v' is a toggle, and will switch you to-and-fro, so you can edit, and later switch back.
NOTE: If Chart #1 is in, say, Aspectarian mode (or Calendar, Parallel aspects, Harmonic, or centered on Pluto), then Chart #2, (and charts #3, and #4) are also in that mode ~ which may be either a boon, or a disappointment! To set up chart #2 the same as you set up chart #1, go [Edit] > [Save current chart data in memory] after setting up chart #1; go [Edit] > [Edit chart #2 data] then press Recall chart data from memory button.Using this option, which is in [Charts], sets the window to showing the midpoints of positions taken from two time-data, presented as a single chart. The two time-data are whatever are entered at Chart #1, and at Chart #2: so given that you have a mainchart loaded, enter the other data into [Edit] > [Edit chart #2], and 'OK' it (it won't appear), or use Chart #2's 'Here & Now' chart: then, selecting [Charts] > [Composite] (the shortcut is 'Alt+shift+Y') will create and show virtual planets and points, at the midpoints for each planets' (or objects') pair of positions across chart #1 and chart #2.
'Alt+shift+Y' is not a toggle. Keyboard letter 'c' (without quote marks), leaves you with the Mainchart again.[Charts] > [Two Wheels], or Three Wheels, or or Four Wheels maximum, (called multiple charts, bi-wheels, synastry charts, in the Helpfile) ~ with these choices, you can pool two charts or more in a single ring.

Load data to each chart-thread you want as well as Mainchart, using [File] > [Open Chart #x], ([Edit] > [Enter/Edit Chart #x data] in V2.05); when they're loaded, then to view them as a multiple chart, go [Charts] > [Two Wheels], [Three Wheels], or [Four Wheels].
A multiple chart is great if one of the charts is your own or a client's, as, using today's positions as the other chart, it reveals what characteristics will be well-met-with, what will not. ~ Or, you can riffle through charts you have searched out, and with Alt+c, compare each with whatever's at chart #2. Find out who's to cultivate, who's to avoid!
Of the multiple chart data, when in Standard Wheel mode you can only see in isolation Chart no.#1 or Chart #2 (view each as mainchart by swapping them via [Edit] > [Exchange mainchart and #2] - a recent, very useful adaptation). Charts #3 and #4 can only be viewed in the Multiwheel.
If you want to compare more than two charts, but want more control and less fuss, the difficulties mentioned with Multiwheel are an argument, maybe, for launching more instances of the program, and either using Alt+tab to view them alternately, or tile them.
Or, temporarily use a switch/macro to cut out the points from the data, so only the planets are shown (as-YR 11 21 1 1 1 1 1 1 1 1 1 1 1 ).
NOTE: This sets Astrolog32 mode to [Charts] > [Relationship Mode ON]. Switching it off (little 'c' without the quote marks), will hide charts #2, #3 and #4. The keyboard switch to invoke #1 & #2 alone is Alt+c.
To avoid more work later, IMO it generally pays to create and save charts individually (in a 'temp' folder in To view only the charts #1 & #2, the shortcut to view them is Alt+c, and '=' (equalsign) appends the data for chart #2 to the info bar with chart #1. In a bi-wheel, the Main chart appears as an inner ring, within #2 chart: curiously, in text mode, the data for chart #2 appears, but not of the Main chart - this is the only way I know of getting quickly to the chart #2 text-data in isolation.
To monitor what charts you've raised, [Help] > [Program Status] will make it clear, tho' it won't highlight which ones currently are on view; (there's no switch for Program Status: to return to the chart, type ' v', (without quote marks). Sometimes the multiwheel can just be fazed, and drop a chart.[Charts] > [Synastry] doesn't look like a multiple chart, - it displays the planets of chart #1 in the houses of chart #2, so it's a virtual chart.
[Charts] > [Aspects Midpoints grid] serves two-chart data, the 'bi-wheel', see Aspects & the Aspectarian
[Charts] > [Date Difference]: this also is a combination chart, (as well as flipping to text), and it needs 'c' to exit it.
Aspects for any chart can be displayed listed only as text, either by closeness of aspect to exact (in °,',''), or with + for applying/- for separating; choose [Lists] > [Aspects],or Alt+l, (which is not a toggle).

Go Ctrl+x for ordering them 'according to power' according to Astrolog's algorithm. (Ctrl+x is a toggle, which will return you to 'according to closeness').
Alt+k renders the list in colour, which may help for picking out a particular object..
To return to the graphical, hit the 'v' key.
 If you want more, or less, aspects calculated and shown, then tick, or un-tick, aspects in [Settings] > [Aspect Selections] beforehand. PARALLELS: Alt+shift+X is the keyboard switch for parallels and contraparallels, aspects for which a tight orb of 1 degree is typically used. (Alt+shift+X is a toggle.) For parallels and contraparallels, you need a time-accurate chart datum. BI-WHEEL: If your current chart is a bi-wheel, this option only presents you with a text-list of all aspects between the two charts, and not the two individual charts' internal aspects.
To view aspects in an 'aspectarian', the Aspects & Midpoints Grid, as Astrolog32 calls it, is, like the chartwheel, shown as a graphical grid or a text-grid: go [Charts] > [Aspects/Midpoints Grid], or take the shortcut, shift+A. Where the object a's row and the object b's column intersect, the aspect-glyph marks the aspect: - these glyphs occupy the left and lower part of the grid.
In the upper-right area, the sign of the nearer midpoint between each pair is shown; ~ the text version gives those midpoints in degrees & minutes. At font size 3 and above, the graphical also shows these midpoints in degrees.
The aspectarians, both text and graphical, update if you press little 'p'. It shifts according to the jump rate & jump factor as set in [Animation]. The aspectarians, both text and graphical, vary according to the harmonic chosen, (but there's no notification in either, which is a drag).
Across the grid, the diagonal descending line of planets and points is made up of the default objects and points your set-up is allowing currently. To identify the planets from their glyphs, click here for an illustrated help-page.
If you want more objects or points shown (e.g. the Dark Moon, Lilith), then as well as ticking more objects in [Settings] > [Object Selections], you must expand the grid to accomodate them, in the dialog box raised via [Settings] > [Miscellaneous Settings] > 'Expand no. of cells in Aspect Grid'; - to change objects frequently, run a switch or macro in [Run] > [Command Line] for a different selection. If it's a bi-wheel's aspectarian, then the Mainchart's objects and Points are listed 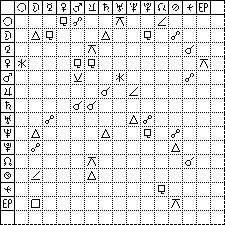 on the vertical axis, chart #2's are on the horizontal. Only the aspects between one chart's objects, & the other's, are shown. (See left)
Going [Edit] > [Copy chart as text] sends the grid to the clipboard, to paste into a document, or it may be sent straight to printer, with usual caveats regarding Character Scale. (see 'Preparing to Print' below). Switch is Ctrl+shift+5.
[Edit] > [Copy chart as bitmap] sends an image of the Aspectarian to the clipboard, to paste up. Switch is Ctrl+shift+6. [File] > [Save chart as bitmap..] will send an image of the Aspectarian to the\astrolog32\miscellaneous folder. Switch is Ctrl+6.

It's according to the aspects chosen in [Settings] > [Aspect Selections, Settings] , whether you see more or fewer aspect-glyphs on the grid (for a guide to them, see right). For this dialog, the keyboard toggle-switch is Alt+shift+A, where ticks in boxes will switch them on.
Alternatively, run a switch or macro in [Run] > [Command Line] for a different selection.
Change your Orbs-of-Aspect at [Settings] > [Aspect Selections and Settings], or go Alt+shift+A.
Alternatively, run a switch or macro in [Run] > [Command Line] for orbs appropriate for transits, progressions, - or use New Macros.
There are two modes for stars now, either:
- The Default: what Stars you get when going [Settings] > [Include Fixed Stars.. ] (or shift+U - a toggle) depends now on which, of them all, are actually aspecting planets at the time-datum; also, by default, Fixed Stars are always 'off', and so must first be toggled 'on'; (this option for viewing leaves [Star Selections], and Alt+shift+R which opens this selection popup, redundant).
- Old-Style, or Alternative: it used to be that a personal selection should be made at the start of each session, as just switching Fixed Stars 'on' meant, if 'all' were selected, the entire batch of available stars used to appear in your chart, and it was a messy sight; on the other hand, if [Settings] > [Star Selections] were all 'off' when you clicked [Settings] > [Include Fixed Stars.. ] (or, go shift+U), then this feature seemed not to work.
Now, it's: [Settings] > [Star Selections] (Alt+shift+R) first, - select - and then the stars appear without more ado (this makes [Settings] > [Include Fixed Stars..] redundant.)
The latter option, lets you keep track of particular malefic or benefic stars, can have quite a set-up then at the start of each session, - the Config.file has no entries for Fixed Stars; and a command-switch cannot do it (though I think once it could).
The change back to the old-style delivery of Fixed Stars, from the modern-style default, is available via the menus, the first checkbox in [Settings] > [Chart Settings] needs to be unchecked and 'OK'ed, then, to make it permanent, the Config.file (Or, the Config.file itself should be opened, altered and saved (e.g. see right); find the line starting
The Orbs of Fixed Stars can be altered in [Settings] > [Chart Settings], to a maximum of 4 degrees, and so long as you save the Config.file, these then are carried over for each session. To switch Astrolog32 quickly into the display of Fixed Stars as a matter of course is only practically possible if "Alternative Stars" is OFF. Some data, and much wordiness, about the Fixed Stars may be reached online at the click of a mouse: go [Help] > [Browse Fixed Stars] for http://www.constellationsofwords.com/Fixedstars.htm, the new destination for background. Values to all objects per se can be conferred as defaults, in the Config. file, in the-Yj ,-YjC and-YjA lines; also, through the [Object Settings] menu; (in both, Astrolog calls power 'Influence'); and, power when-in-transit has defaults in theYjT lines, or [Aspect Settings] menu.
To do this, users of Astrolog32 can apply power-numbers piecemeal to each aspect, orb and object, either as in the past through amending the Config.file lines, or now, through these menus:

higher numbers signify more power, on a scale from 0 to 50, but at default, 'influence' was always at 10 for the major planets and the house-cusps, less or none for minors. With V2.02, more detailed values obtain. Or you can open [Edit] > [Edit configuration file..] to inspect/alter 'Influence' settings in the Config.file, and Ctrl+s to save file.
- [Planets & Minors Settings] > [Minors] or (Alt+j),
- [Cusps & Uranians Settings] > [Uranians], or (Alt+shift+J),
- [Settings] > [Aspect Settings], or (Alt+shift+A).
To see the current chart's values for the objects and aspects, in text-mode go shift+J. (shift+V to return to locations).
Far more values are allocated, for House, for dignities and accidental dignities, if object directly disposits many planets, by ratios inside the program, and these, and your planets' defaults are totted by math, and displayed in '-j ', '-j0 ' text-lists, using these switches in command-line. Fullest explanations are inHelpfile.TXT andHelpfile.html , where Walter Pullen calls power 'influence', Val Abramov calls it 'power', and both have made copious explanations there dispersed in the text, so seek:
W.P :
"-j : Display astrological influences of each object in chart. ",
"-j0 : Like-j but includes. ",
"-D : " - to list power in the aspects,
"-T ,-T [p ]n : " - to list power in the transits,
then
" Determining the strength "
" Weighted chart. "
"-Yj "
" For each of the 18 aspects "V.A :
" 4. Power Calculations - overview "
" EXPLANATION of POWER CALCULATIONS "
Power/Influence values that you choose have a great bearing on Astrolog's Interpretations output.
Because this feature does not differentiate kinds of power which in my experience have no overlap in their different trajectories, and as the user controls call first for a Delphic knowledge of the ratios, I am not yet served by the product of these calculations, so leave the topic to the motivated enquirer.
Note: As planet Earth is not included in Power calculations, Astrolog cannot reasonably estimate relative power in non-Earth-centred charts.
These are a set, not unique to Astrolog, of non-existent objects in defined orbits, the product of some bygone dippyness. Seeseorbel.TXT , in\main for more.
(But these are useful, as their orbits can be redefined in much older editions of Astrolog32; recent times have brought the discovery of real objects beyond Pluto, and if an agency is found in them, each's orbit can be given to an Uranian; or, if you want a fixed object in the Cosmos, an Uranian would serve, (but only with Astrolog32 V1.10, an older release. See FAQs here.)
By default, though, these are restricted from view and calculation. Select them via [Settings] > [Object Selections].
[File] > [Exit] used to kill Astrolog32 immediately without any invitation to save charts; since V2.04, there's a dialog to confirm quit.
Hitting letter q, or Esc key, operates in the same manner.
Accessible from the open program, Astrolog32 V1.3x has only the Helpfile in.TXT format, and the Readme in.HTML format, - only these two editable files can host a users' custom data, or some of it; more recently, version V2.05 has just theHelpfile.TXT , andCompanion.HTML which has an editable .RTF file (for older I.E., try Paste-in,then_Save-As_Sample.RTF). Of these,.HTML is useful as you can call up hotlinks or pictures. Here's how..
HTML accepts hotlinks, or pages, maps or pictures, all of such pages or pictures being created then saved in, for simplicity, the\main folder. If you have installed V2.05, open\main, \companion_files , and opennoconfig.HTML with Notepad (where you'll find instructions, in capitals); but with earlier releases, openReadme.HTML in Notepad, and scroll to the Disclaimer.mypage.HTML ';mydoc.DOC '; OR 'mypic.PNG '.
A typical hot-link to raise a local webpage out of the\main folder:
<a href="mywebpage.HTML" target="_blank">my webpage</a> easy! ..on the same line, add <br> <br> if there is another..
Here's my Astrolog32 Readme link, in V1.30, to raise a copy of the Companion saved in\main :
<a href="companion.HTML">The Companion to Astrolog32</a> and add <br> <br>
Here's a link to raise an image, 'British DST table' out of...\main :
<a href="DST-table-image.PNG" target="_blank">DST table</a> ..and, add <br> <br>
Online, for linking to a website, it could be like:
<a href="http://www.southville.net" target="_blank">Link to Southville for atlas, etc..</a>INSTEAD:
in Astrolog32 V2.05,
Readme.HTML is no more! - For paths, snippets and switches, the easiest dodge is to use the top of theHelpfile.TXT , (which you'll find in\main ), as image to right .. but you can't put hotlinks to images or websites.
The Helpfile is a cornerstone to understanding how Astrolog works, and how adaptable it is. BothHELPFILE.TXT andHelpfile.DOC present you with the same information - a library of command-switches, -Helpfile.HTML , a little more.
After a thorough listing of command (and keyboard) switches which alone used to control the program, then the more informative part of 'Helpfile' follows, in 'DESCRIPTION OF EACH COMMAND SWITCH', explaining what each switch does (and sometimes how).
After that section, there's a by-the-way explanation of the [Menu] options in "MS WINDOWS FEATURES"; after that, Astrolog's compiling data; and sundries are at the end.
It needs a long familiarisation, - there's a lot of technical information which for the new user is gadabout and hard to navigate; me, in seventeen years, I had not read the half! - nowadays I open a Find box (Ctrl+f), then type in one word or, better, a switch that may lead me ultimately to a paragraph on the topic I want; that's why I re-wrote the Helpfile as HTML: if you haveHELPFILE.HTML bundled, click here..
Valentin Abramov's additions to the end of the original Helpfiles (re. 5.41G, and in 1999) are in my opinion an more expansive read, but so are "X WINDOW GRAPHICS FEATURES" and "MS WINDOWS FEATURES", too, and the latter section I recommend to menu-users.
TIP: If, in the  to get hot-linking!
 Users of this key document need to understand:ONLINE HELP-PAGES
1. a little bit about program routines, and, having an eye to how to undo any changes you raise, e.g. by using shift+V, or 'kill' switches, etc., - about, see in ABOUT SWITCHES.
2. drilling down for the first time, you can pick a listed topic in SECTION 2, in the "List of Commands" - each is then expanded on in "Description of Each Command Switch" further down the document; (and SECTION 4, "Data Entry And The Main Display" is a technical look at how data goes in).
3. command line switches were the anticipated way of working, and info is listed by each switch, - its action will be listed both in brief, then in detail, see here. Consider this list as now referring to the equivalent and extensive menu options of Astrolog..
4. tag-brackets like < and > are used to enclose where a number or name is required, but you are not expected to use the tag-brackets in your switches, nor square-brackets, nor the semi-colons, which just mark where the working code ends and the explanation begins (see section below ABOUT SWITCHES > 'Switch Parameters').
5. In both documents, 'printed' often means 'displayed onscreen', not at the printer!, Options for printing text out are barely covered in the Helpfile.
6.HELPFILE.TXT andHelpfile.DOC were both inside the\main folder, and opened via the [Help] menu as standalone windows. With V2.05, only TXT remains, along with 'The Companion'.

--------------- -----------------
[Help] > [Browse Astrolog32] - seeks an net connection to a homepage of Astrolog32:
v.1.30, http://uk.geocities.com/astrolog32/ (defunct)
v.2.02, http://www.orionsoft.cz/astrolog32/ (moribund)
[Help] > [Browse Astrolog home] - seeks an net connection to Walter Pullen's frequently-updated home-page, http://www.astrolog.org
[Help] > [Browse Astrodienst Atlas] (shortcut is Ctrl+shift+W) - enter your birth-town in an online searchfield, at http://www.astro.com/atlas
[Help] > [Signs] (Alt+2) gives each's modern ruler, part of human affairs associated, and which House has similar qualities (hides chart)
[Help] > [Objects] (Alt+3) - lists all available objects and the Fixed Stars, with, in the case of the planets, their Fall, Debility and Exaltation signs (hides chart)
[Help] > [Aspects] (Alt+4) - lists the aspect glyphs, with the orbs you have set (hides chart)
[Help] > [Constellations] (Alt+5) - their names and significance (hides chart)
[Help] > [Planet information] (Alt+6) sizes, distances, moons & solar year (hides chart)
[Help] > [General Meanings] (Alt+7) - a very basic steer to the kernel of astrology (hides chart)
[Help] > [Keystrokes] (question mark) lists the older single keystroke toggles. (hides chart). Note: to 'animate chart', ENGLISH A32 uses 'p',others, 'N'.
[Help] > [Switches] (Alt+8) lists the Command Switches, not keyboard switches! (hides chart)
[Help] > [Obscure switches] (Alt+9) lists the latter group of Command switches (hides chart)
[Help] > [Program Status] tells you what charts are loaded (hides chart)
[Help] > [About Astrolog32]: (Ctrl+shift+O), is a potted history, now with 'cold' weblinks for current release sites, opens in a separate window
* * NOTE: (hides chart) - Press 'v' key, without the quotes, to return to your chart from these options.
* * NOTE: Have these listings open while you work, by saving pages you like with [File] > (Export) > [Save chart as text].
Living with a hyperactive keyboard!
Followed closely by 'h' - Heliocentric, and 's' - Suddenly in Sidereal!
Old-school users will be used to such brinkmanship in an end-user program. Newbies are warned - be ready for the unexpected, working to save promptly any unsaved charts.It may help to have an steeply-raked keyboard.
Failing to clear each keyboard switch may provoke unwanted overlays of text and graphics, - the 'Backspace' and 'Spacebar' keys may only offer a short respite if this arises.
One of Astrolog32's greatest features has been its ability to advance and regress charts in different steps; see it by simply pressing 'p', it will show the default advance, - every second, it will advance the chart-datum one day; every time you hit 'r' , it reverses; and when you hit 'p' again, animation stops.

At [Animation] > [Jump Rate], each hop can be set from a second, to a minute, an hour, a day, a week, a year, a century+.
At [Animation] > [Jump factor], any Jumprate you choose can be multiplied.
Shortcuts to all these jumprate options can be found in the page TABLES of KEYBOARD SWITCHES.
This animation feature works not just with charts, but in horizons and map views, ephemerides, lists and the calendar, and continues to shift the chart through time even when Astrolog32 is the inactive window.
A $-sign returns to shifts by day-interval.
If one second is too quick a rate for each step to appear onscreen, adjust the one-second default via [Settings] > [Graphics Settings]. As animation progresses or regresses the chart, the data-fields in the [Edit] > [Edit Mainchart Data] dialog-box update accordingly, - they do not remain at your starting point. If you switch chart #2 for chart #1, that chart will start progressing too - while the other will stop.Pressing [Animation] > [Timed exposure] (little j) during the graphic of [local horizon] or [Orbit], e.g. see here, each interval will 'leave trails of positions', which illustrate the apparent trajectory and speed of objects in the night sky over days.
Pressing 'backspace' key will clear the screen at any point.
Have a live planetary clock running perpetually!At the 'Here & Now' chart you start with, press shift+1 (which makes !), then p: the chart will update by tiny steps each second, and you can, among other things, monitor aspects making and breaking (shift+A), or view your local horizon (shift+Z; plus, in the Northern Hemisphere, i), with the planets' relative dispositions in the sky, or watch globe-rotation in real time.
This relies on your animation-update-rate remaining at one second, which the shift+1 switch set.
Press p again to stop the animation, and $ to reset animation jumps to 'days'.
[File] > [Print...] (the keyboard switch is Ctrl+p), opens the 'printer' or 'choose printer' dialog box to print directly: but you may want a 'landscape' print-off: go Ctrl+q first! ~ Astrolog32 has its own Postscript setup, that can be managed in the [Settings] > [Miscellaneous] dialog box.
Prior to printing text or a graphic, the Character scale will affect the font-size - 'Ctrl+2' is default, and 'Ctrl+1', ... 'Ctrl+3', and 'Ctrl+4' are other switches for glyph-size that can be set, no matter whether in Graphical- or Text-mode, though in your text outputs, only the lettering and numbers will be shrunk or enlarged.
Alternatively, [Edit] > [Copy chart as text] sends a text-version to your clipboard, so you can paste and format in a text- editor. (this will bounce the chart-view into text-mode anyway). This clipboard item can be pasted into Wordpad or other editor. This routine allows you to copy all textlists, like Interpretations, or Aspects, and format them into MS Word, or a publishing software of your choice.
The shortcut is Ctrl+shift+5.
For set-up of text outputs, see APPEARANCE & IMAGING.
There's no need to reverse background when printing text nowadays, white-on-black text onscreen will print black-on-white, anyway. For printing filename lists, see F.A.Q.s - How can I print off a list?[Edit] > [Copy chart as bitmap]: this makes a copy of the chart image, or any other graphical display (& if you are in text-view, it will bounce you into graphical mode), available in the Windows© Clipboard, which you can paste straight into Wordpad (here, if you are viewing this in an older I. E.); or it can then be pasted into any image-editor that will host bitmaps: you can then save in any format.
With V2.04 and V2.05, the shift + Q switch shrinks the size of the graphic before copying. ~ to get it back to size, use the pull-handle.
But compare [File] > [Save chart as bitmap], (now in [File] > [Export]), where you can save a bitmap image straightaway, in four actions, using the shortcut Ctrl+6.
For set-up of graphical outputs, see APPEARANCE & IMAGING.
 Also in [File] > [Export], there's ..Save as WMF, a slick image file sent to As an alternative to WMF, PostScript graphics create an EPS file in
 Getting things the way you like it, you can follow two avenues: tweaks for the present session only, and permanent tweaks, such at setting things up.Session Tweaks
The session tweaks are best left to command switches and keyboard switches, or using the menubar until the switches become memorable; the permanent tweaks have to be made at a time when a beginner is unsure about method - they're covered in Core.
Session Objects
See More
Rare
Core
& Save
For Sidereal users, in Astrolog it's a snap to call Sidereal (toggle 's'), Decans (toggle 'g'), or Navamsa (toggle 'y'), or Domal (toggle 'f') - - these are all simple keyboard switches. Heliocentric is easy, too (toggle 'h'). (See Sidereal, Vedic).Mostly Appearance
Unhappily for workaday Tropical users of Astrolog, our least-used adjustments to the program (after setup) were assigned many of the simplest keyboard switches (e.g. h, g, s, y, f - all Sidereal tweaks); this means that for our typical everyday, say for viewing aspect lists, dispositors, colored text or transits, shift-key keyboard switches do much of the heavy lifting; and for delivering some newly-available lists like Major Configurations we must dig into [Settings] > [Chart Settings] and tick boxes.. (see Midpoints & Planets' Configurations for that journey!). To redress matters, here's a Remedy..---------------These 'lets' and restrictions cover most options:
[View] > [Colored Text], Alt+k, 'Colored Text' is applied to text not to graphics: (it bounces you into text-mode when set, so to get straight back to the graphic, type v). Your preferences can be made default, - see Core.
Hiding the program!: There's a way to hide everything leaving a plain empty window: hitting the 'Backspace' key does this, and [View] > [Window Settings] > [Clear screen] does too.
Pressing 'Spacebar' calls Astrolog back again,as can its menu equivalent [View] > [Window Settings] > [Redraw screen] - and this last tweak eliminates any on-chart marks, accidental or otherwise.
Hiding planets/ other objects: going [View] > [Show glyph labels] (toggle little l - l for 'lunch') will hide/show all planets, luminaries and calculated points, like the nodes - just the aspect-lines remain; this is how the chart will print. It will call the graphic-mode, if you're at a text window.
Hiding aspect-lines, not so easy, but see how-to in About Switches. But Bonus Mode hides lines in Gauquelin Sectors.
[View] > [Show border] (b is the toggle): this hides, or shows, the border around the chart, - this will call the graphic-mode. You can't make this a default feature, except by making the colour parameter for the lines the same as the background colour ~ which is a dodge! ~ achieved by alteringastrolog32.dat , at Main Colors (the-Yk 0 8 line), or through modifying [Settings] > [Color Settings].
[Extra] > [Bonus Mode], (toggle i): Bonus Mode has different operation, according to your display: (in text charts, Bonus Mode calls graphical)
- In chart-wheel: hardens the main aspect-lines, thins out the minor ones
- In Aspectarian, the midpoints and the glyphs are swapped
- In Astrograph, it shows when MC sweeps each planet, on a given day (useful)
- Hides the Moon's course, in the graphical-ephemeris
With [Extra] maps and constellations:
NOTE: [Extra] > [Constellations ON], (shift+F) swaps between 'looking at the sky', and 'looking at the globe'.
- flips Show/hide planets in [Show Globe], or amid Constellations
- .. other effects are negligable
[View] > [Reverse Background], little x, inverts both your text and graphics colours, (follow it maybe with m for monochrome) - fine if you chose a dark background, but want to print black on white. In earlier versions of astrolog32, you can opt for 'reversed colors' at launch, and simply saveastrolog32.dat .
[View] > [Graphics Mode], [View] > [Text Mode] - (it bears repeating) - swap between seeing a graphical chart, and seeing chart data as text: much quicker typing little v.
[Settings] > [Calculation Settings] - this dialog avails to set harmonic charts and opting for another planet at the centre of the chart - but it's quicker by command-switch.
You can set up Astrolog32 to display and give data for at least 117 objects & points, including cusps; 127 if you include Arabic Parts in the available text list. By default, only some 24 objects are shown, or listed in text-mode, from a given chart-time-datum.
You can include or exclude objects or points on a per-session basis according to the nature of your work, by using the dialog boxes itemised below: you can make more objects (like cusps, minor planets, etc, but not Fixed Stars), appear every day by default in your text- or graphics-views, by saving the Config.file (astrolog32.dat ) after you have expanded or restricted what you want.
Each link ending in "...Selections" in the [Settings] dropdown menu will open a dialog-box, (though there are quicker ways).
1. By way of [Settings] > [Object Selections], all major and minor planets, also Uranians, and the cusps, can individually be restricted from view and calculations. (the keyboard switch for this dialog is Alt+r).
2. By way of [Settings] > [Transit Selections], all major and minor planets, also Uranians, and the cusps, can individually be restricted/reset in calculations when transitting. (the keyboard switch for this dialog is Alt+shift+F).
3. By way of [Settings] > [Progressed Selections], all major and minor planets, also Uranians, and the cusps, can individually be restricted/reset in calculations, when progression dialog box is used. (the keyboard switch for this dialog is Alt+Ctrl+p).
4. By way of [Settings] > [Aspect Selections and Settings], Alt+shift+A: this important dialog allows to reset the Orbs and any Influence for each of the Major and Minor planets and Points used: tick-box the ones you want 'on', untick those you want 'off'.
If you need to alternate between two (or more) aspect-sets, I suggest to use macros to reset, and then to return to default (MACROS & HARMONICS).
5. By way of [Settings] > [Planets & Minors Settings]: this dialog allows to reset the Orb-Additions and any Influence (Power) of the Major and Minor planets, and Points used. Again, macros allow different addition-sets to be called ad hoc.
See that a maximum Orb (defaulted 360 degrees) exists for each, - which means you can 'clip' accumulating Orb Additions, e.g. at 15.
Under "Add" and "Influence", a "0.0" here indicates that the objects have not been weighed for more orb, nor as to 'power' - those numbers can be upped to your choice, such as extra two degrees for the Sun.
6. [Settings] > [Cusps & Uranians Settings]: as '6' above, to trim orb of cusps and Uranians
To make your selections permanent, now go [Edit] > [Edit configuration file]; Saveastrolog32.dat and close.
THE FOLLOWING CANNOT BE MADE DEFAULT, ONLY SESSION:
7. [Settings] > [Star Selections]: here, select your preferred Fixed Stars, (and, in V1.30, go [Settings] > [Include Fixed Stars], shift+U): they will appear for the session only.
8. [Settings] > [Calculation Settings], planets can be locked on a chart's Ascendant Degree, or at Midheaven.
9. [Settings] > [Calculation Settings], any Central Planet instead of Earth can be selected, with the exception of Moon.
'Beginner's Option' - see below
Display more accurate positions of Objects and Points, as a permanent feature: either
1, in the Config.file, set-b0 to=b0 , then:
[Edit] > [Edit configuration file]; Save it and close.
Or, 2. go Alt+b, then:
[Edit] > [Edit configuration file]; Save it and close.
o
Or, 3. in [Settings] > [Chart Settings..], on the right of the dialog, together with Scientific Notation of degrees in decimal. OK it, then:
[Edit] > [Edit configuration file]; Save it and close.
Switch off redundant Aspects/Change the Orbs: go [Settings] > [Aspect Selections & Settings] which calls the reset-fields for all aspects (bar any orb additions), including if they are to be listed for 'applying' and 'separating'. Astrolog reckons orbs in decimal: in this Companion in ATLASES, there is a converter from minutes of arc to decimal. (Alt+shift+A also calls this). See BASICS # 1 > Aspects to identify the aspects available, and the symbols used.

Showing Other Aspects: Going [Settings] > [Parallel Aspects] (toggle is Alt+shift+X) hides the general aspects and shows instead the parallels and contra-parallels, for view, list-view, calculations and printing - you can't set this as default.
In some situations, the switch-gp will present as text, the Midpoints Grid, plus parallels listed. It's unreliable, and not a toggle.
Quintiles and Septiles are maybe best called with a command-switch which switches them on while switching Major Aspects off. Try-YAR 1 5 1 1 1 1 1 -YAR 6 11 1 1 1 1 0 0 -YAR 12 18 0 0 1 1 1 1 1 ;
These and other small aspects also may be in Configurations but not noticable in the chart, because the planets are apparently randomly placed around the Radical: use harmonics 2 or 5, to see such things.
[Settings] > [Calculation Settings], (Alt+shift+S), is important for making very major in-session alterations, but only choice of Nodes, Sidereal Houses, Sidereal Offset of objects' positions, and your settings for Lilith (Dark Moon) can save to become default: heliocentric, or any planet-at-centre (except Moon) charts can be opted for here for the session, and harmonic charts derived from the basic chart data. Opt here for equatorial positions instead of ecliptic. But these latter cannot be made the default status for Astrolog32.

[Settings] > [Chart Settings], (Alt+shift+C) is a portmanteau dialog box where
1. the default 'Alternative stars' can be switched so that the new-style view of those-currently-aspecting is shown as default. A tick in the box will reverse this, and vice-versa, to make Alternative Stars default. Also, here are various different additions to text-lists.
2. summaries of major aspects
3. planets' speeds compared with mean velocity
4. include aspects to midpoints, among many. (It is often necessary that the appropriate text-chart be called.)
Here too..
5. you can add the immediate-dispositors' glyphs to the Signs in the wheel. This is a cabinet of assorted fixes, and includes how
6. 'Flower' graphics are displayed.
Command Switches offer a rapid path to many of these re-settings, see ABOUT SWITCHES.
[Settings] > [Arabic parts Settings] is a dialog where you can define different calculation formulae and inversions, and the circumstances where Astrolog32 will list any Part's aspects. There's no shortcut.
[Settings] > [Graphics Settings] - You can alter your standard animation delay (in milliseconds) here, for the duration of your session.
Otherwise, see APPEARANCE & IMAGING for this dialog's other tweaks, and those of [Settings] > [Color Settings].
[Settings] > [Special] > [solar chart] (Alt+1) puts the Ascendant at the dawning Sun.
[Settings] > [Special] > [Flip signs houses] (f), this creates a Kensky chart, useful to think about a chart, as if things were otherwise.
[Settings] > [Special] > [Geodetic houses] (Alt+shift+H) houses of interest to 'quake analysts.
[Lists] > [Arabic parts] tells the program to serve the Arabic parts text-list. Alt+p is the shortcut.
[View] > [Sort aspects by power, or orb] (Ctrl+x is the toggle) re-sorts the aspects list (see [Lists] > [aspects], Alt+l), accordingly.
[View] > [Show Aspect Info], (shift+I, a toggle), shows or hides a power calculation derived from the aspects in the chart - this only affects the graphic chart-wheel. If you're in text-mode, this will flip Astrolog32 into graphics-mode, with the calculation added.
Beginner's Option
You can opt for Simplified Mode, (only available with V2.04 and after), after your first launch - it's in [Settings], - where you can return to 'Advanced' at any time. This tidier window means a beginner can concentrate on chart-making (and viewing and saving), learning Astrolog32's way-of-working.
Before opting into Simplified Mode at all though, you need, while in Advanced mode, to set-up any basic requirements, like Sidereal or Tropical?.. chosen House System?.. and, do you want Objects' locations to-the-second? anything else? ..(see below).. - and then be sure to go:
[Edit] > [Edit configuration file], and save file; Close ; next, go [Settings] > [Simplified Mode] and then again [File] > [Save current settings], and save file and close it, if you mean to keep wth this choice for a while.Altering date format: D-M-Y (Europe/Russ/Afr/N.Z) or M-D-Y (US/Can), ~ find this choice in [Settings] > [Miscellaneous Settings]; and change here the number of columns'-width of text-data, whether onscreen or to print.
This dialog, (Alt+shift+B), has a field to add or remove cells in the graphics-mode aspectarian grid, to accomodate more, or less, points or objects, as you make them default or necessary in the [Settings] > [Object Selections] dialog.
Press 's' without the quotes, to switch between Tropical and Sidereal view of the Zodiac's offset to the Cosmos. Setting your preference during a session and, before quitting, saving the Config.file, makes your choice your new default.
([Settings] > [Calculation Settings] sets a different Zodiacal Offset for Sidereal charts). Then, [Settings] > [House Types] sets a different Tropical or Standard Sidereal house system.
At the same dialog box, restrictions or lets can be applied to the 'Angles' cusps' data appearing too. Positions for ASC, DESC, M.C, and I.C are not in the chart info, because Off by default, and here this default can be altered - just save the Config. file.
Also, you can reset what interpretations you want to see, or chose 'None'; and maybe add more columns for text to display, as suit widescreens nowadays, - and tackle your Postscript paper settings for printing.
Your choices of glyphs for Pluto, Uranus, and Capricorn, also Lilith, are in [Settings] > [Graphics Settings].
[View] > [Colored Text], Alt+k, is applied to text not to graphics: you can abandon this default, by alteringastrolog32.dat , (change-k to=k ). Save the file.
Hidden from us while we change our settings, theastrolog32.dat file in computer memory isundergoing constant re-drafting.. so when we decide to Save Settings, it is the exact current setup which over-writes theastrolog32.dat you launched with. A link to do this is in [File] menu. Then re-launch Astrolog32 to see it's true; but you can also go Ctrl+s with the file, opened by [Edit] > [Edit configuration file].. Which is preferable?.
For example, defaults at installation are: white background (version 2.02 on), locations in minutes of arc, graphical chart, Tropical signs, .. and of course your default location, .. yet it is a one-minute job if you are an old hand, to change three of these so that you have new defaults. (Changing default location takes a little time .. see below for how.)NOTE: Any changes you save are reversible.
A. By keyboard switches: To set Astrolog32 to, say, 'print nearest second', text, and Sidereal, go Alt+b; then go 's', without the quotes, then 'v' likewise..
or, if you have version V1.30 or before, go 'reverse all colours',.. 'x', without the quotes (In V2.0x, you must go via menus, CL, or Config.file to permanently abandon white).
Or B. By menus: To set the program to, say, monochrome, and treat cusps as 'objects', go [Settings] > [Object Selections..], find 'cusps' and click 'Select All', then go 'OK'; then go [View] > [monochrome]...
Then C. ..NOW THIS WILL OVERWRITE YOUR CURRENT SETTINGS! -ALSO ANY OLD-STYLE MACROS!
go [File] > [Save current settings], and 'Save' ~ OR ~ [Edit] > [Edit configuration file], then Ctrl+s, then close.
Close Astrolog32 and re-launch it.
Changing default location/timezone/DST:
Go [Edit] > [Set default location/timezone], or (Alt+shift+D), to call a dialog for changing:

1. Annual DSTs ~ type 'yes' if it is DST currently.
2. Home timezone. ~ ..find your off-set to UT here.
3. Degrees Easting or Westing) - obtain via [Call Atlas] if your country's included, or....
4. Degrees Northing or Southing) - or via Google, via GPS phone (type in to replace defaults)
5. Home location name ~ type in if atlas doesn't insert; ...
- if online, go astro.com/atlas.
After edits, go [Edit] > [Edit configuration file], and 'Save'.
Close Astrolog32 and re-launch it.
For instance, to set Astrolog32 to Earth, Sun and Moon only at every launch, open the Config.file, find
-YR 0 10 0 0 0 0 0 0 0 0 0 0 0
and change to-YR 0 10 0 0 0 1 1 1 1 1 1 1 1
Save the file..
Launch Astrolog32. To reverse this, revert to the upper entry, and save.
Or, to set Astrolog32 permanently to the display of, say, the derestricted display of all 'minor planets', and true nodes rather than mean: find the line starting -YR 11 21 ..and change all the ones that follow to zeroes;
find_Yn , and change it to=Yn .
Save the file with Ctrl+s
Launch Astrolog32. To reverse this, revert to the upper entry, and save.
Save the file with Ctrl+s ? - OR - go [File] > [Save current settings], and 'Save'. ?
one doesn't wipe old-style macros you have inastrolog32.dat , one does. details here.
For an in-depth explanation, try the section dedicated to manual editing CUSTOMISING DEFAULTS via CONFIG.FILE.
Things that can't be made default are:
1. The Fixed Stars: they won't appear until called.
2. The harmonic that Astrolog32 launches with: that's Harmonic 1 only.
3. Astrolog32 can't launch with other than a one chart graphic complete with info sidebar; or with a text-list of positions.
4. Anything on the [Extra] menu.
5. Chart at launch cannot be other than Earth-centred.
-------------------------------------------
If you modify the config.file to the point where Astrolog32 no longer works, all isn't lost:The Mainchart's dispositors can be seen - in various hierarchies - by typing shift + J (not a toggle), or clicking [Charts] > [Dispositors]; use Graphics mode (If you're in Text mode, a grid laid out in text used to appear - now it is a list of Pullen's power estimates.)
NOTE: using the keyboard shortcut shift+J, a bug was apparent in v2.04, - text and graphics can overlay, and the background change - it's fixed now: using the 'Chart' menu method is safe.
The planets higher in each cell disposit the lower ones. Incidentally, the layout of the Sign Dispositors can indicate, to a seasoned user, whether a chart has 'good yoga' - i.e. most planets being sole occupants of the Signs they fall in.
As in other modes of the program, pressing 'p' makes it update by progression.
Use shift+V to return to the chart-graphic.
Dispositors will vary according to the harmonic chosen, as the planets will fall in different Signs. The House Hierarchies may only be correct where the chart time is correct.The descending order of planets-by-Sign (left) is a schematic of the chain of dispositions of a chart of W.H.Davies (right).
Springing from an idea from Theodoros Natsinas, and getting away from the Radical's aspect-display, this chart is an analytic of significant degrees of a given chart, expressed in the chart circle as a petal-shape, radial from the centre, toward degrees that are 'trigger points', i.e. sympathetic/antipathetic to the planets' positions as an whole; with waves or spikes at the circumference.
It looks for two kinds of point, those that accentuate tension, and those of most benign aspect - 'Harmonic' here means harmonious.
Opening [Settings] > [Chart Settings], (Alt+shift+C), is the only way of opting for this graphic, or switching it off.
[Charts] > [Biorhythm Chart], (shift+Y), sets up a sine-wave chart showing three varying qualities at a glance - "Intellectual", "Emotional" and "Physical" assessments; note that these are reckoned for the chart #2 birth-datum, on the day of the Mainchart, so, either both chart#1 and chart #2 need to be set up or if only the first, then by going shift+X then shift+Y, 'today's evaluation' for the Mainchart can be seen. Shift+Y is not a toggle.
The waves' low points reach -100% (said to be a low ebb), .. +100% (said to be buoyant).
The graphical shows month to view, the text version gives the biorhythm percentages for the seven days before (T-7 days) and the seven days after (T+7 days) on the date cited as chart #1.
The command-line switch is-rb , and needs the files to be specified in the command-line.
-r0 <file1 > <file2 > ;
will keep the charts separate in comparison.
There is a distinction between any of the above types of particular relationship charts and the actual comparison between two separate charts.
The-r0 <file1 > <file2 > option is used to generate actual comparison charts.
For example, to see what your biorhythm is like for the beginning of December, do "astrolog -qm 12 1998 -rb nul yourchart" on the command line and no further input is needed.
For example, combining-r0 with the-g switch will cause a full grid chart of the aspects between all the planets of the two charts (with person1's planets on the vertical axis and person2's on the horizontal) to be displayed.
The-yb <file> switch will display the person indicated in file's biorhythm for today. The-yd <file> switch will display how many months, days, etc old the person in the file is right now.
There are also switches-yp[0] and-yt which similarly behave like-rp[0] and-rt above but automatically compare to now.-Yb <days >: Set the number of days to span for a biorhythm chart.
It is easy to retrieve the Mainchart, after going shift+Y, or using the [Lists] > [Transits] opens the 'Transits' dialog box so you can input a point in time ahead of the Mainchart's, (of course), so as to to see any particular day's (month's, year's) transits to the Mainchart which you have running. The 'hits' are displayed as a list.
('Here & Now' button selects 'now, today', for any hits to the Mainchart.)
Keyboard switch is Alt+shift+T - press v to return.
This input dialog also appears when using V2.04+'s 'General' & 'Particular Planet' transit Macros -Ctrl+F1 to Alt+F1 , - these allowing the display of transits under any custom parameters of the macro.
(NOTE: You can use this dialog to set a progression target-date, as well).
Both V2.0x & V1.30 have another option [Transit & Natal], in [Charts]; this works in graphic mode as a bi-wheel, when you have set your chart#2 as the future day you are enquiring into: chart#2's positions surround chart#1: the Moon is restricted in all versions of Astrolog32, (but can be seen if you go shift+X, or v for text - both toggles).
NOTE: Usually, orbs are reduced before charting transits - I reckon the pandemonium of daily life hides their approach - V2.0x TRANSITI macros do this automatically; otherwise, set a [Lists] > [Midpoints] offers a text-list of the mid-span positions between every pair of planets, points & angles between the Mainchart and chart #2, so it's a two-page printoff of some 112 mutual midpoints of all objects. Going [Edit] > [Copy chart as text] sends the list to the clipboard, to paste into a doc., or it may be sent straight to printer, with usual caveats regarding Character Scale, or appended to other text output.Planets' Configurations
See also, in the Aspectarian grid, the midpoints' Signs are displayed in upper right half, both in the graphical and text display.
 First, click on [Settings] > [Chart Settings], and tick the box for "Text Aspect Grid Shows Aspect Configurations, (text)".
Also, click on [Settings] > [Aspect Selections], ticking the box "Text Aspect Lists show Aspect Summary": the configurations will appear after the text-list of aspects, too.
Configurations reckoned are: Dish, Grand Cross, Grand Rectangle, Grand Trine, Kite, Stellium, T-Square, Yod. Before reviewing the Configurations present, restrict Points which are not planetary in [Settings] > [Object Selections]; or run a macro to suppress them. For pictures, see WORD LOOK-UP.
Clicking [Settings] > [Sidereal Zodiac] relocates the zodiac according to its antique linkage with the constellations, named for the Signs: you can use the keyboard letter 's', a toggle which switches in/out of Sidereal/Tropical; saving the Config.file will make this choice your default charting mode.
For a familiar thirteen-box chart, choose 'text-mode', and perhaps Alt+shift+V.Reversing the sequence of the signs in the zodiac, Vedic orientation is called by the letter 'z', (this is a toggle), or by altering [Settings] > [Vedic wheel Display] (which is like [Settings] > [House Types] > [Whole House] - the house divisions each appear 30 degrees across the zodiac, so there are no intercepted signs). Now, Lagna is top-left. [Settings] > [House Types] > [Shripati Houses] will adjust objects' positions from any default Western house-system.
Otherwise, [Settings] > [...Calculations Settings] is an essential point-of-visit for Siderealists, being a portmanteau dialog box for setting up a number of features (the switch is Alt+shift+S - it is not a toggle); under Zodiacs, there are seventeen Ayanamsa settings ~ find here Fagan-Bradley, Hipparchos, Sassanian, & others.
The trans-Saturnians can be suppressed from their default appearance by de-selecting them in [Settings] > [Object Selections], made permanent by going [Edit] > [Edit configuration file], and savingastrolog32.dat . Saving the Config.file,astrolog32.dat , (go Ctrl+9), saves any other alterations you have chosen, too.
Or keep your options open: press ' v'. then 'Alt+shift+V', then just run a macro like/s 24 /YR 0 10 0 0 0 0 0 0 0 0 1 1 1 /J /c 13 ; , when you want a Sidereal perspective, without making Sidereal charting your default.
Harmonics can be set in [...Calculations Settings], too, and can be raised without reference to the Sidereal elements in the dialog box, simply by entering a number in the relevant field, and OK'ing. In order to go from one harmonic to another, simply alter the 'Harmonic chart factor' again - the numbers will not compound, it re-calculates from the Radical.
Decans, (which are not the third harmonic), can be called by [Settings] > [Special] > [Show decans], or by keying letter 'g' (a toggle).
Similarly, the Navamsa is three clicks away, via [Settings] > [Special] > [Show Navamsas], or, type letter 'y' (also a toggle).
If you want both Sidereal & Tropical charting available from a single install, you might opt for Astrolog32 V2.04 onwards, as you can run different config. files from the [Run] menu; otherwise, you can write a command switch to bundle all the alterations implicit in such a change (and a switch to flip them back!). For harmonic charts otherwise, see HARMONICS. Note that no Navamsa nor Decana Kundali chart will save as a The Interpretations set do not serve for Vedic-cast charts, but could be adapted for users of Indian method; you would have to re-write the input A rough map of the constellations is to be found in [Extra] > [Constellations On], (shift+F), with [Bonus Mode], little i.
These re-divide the House-Wheel, nine unequal sectors to each quadrant, interpolated without respect of House Division's irregular spans-by-latitude, apparently according to some exponential scale. They serve to fraction areas of charts for comparative analysis of planets' positions (whether high or low, east or west), set against people's professional career choices, or their lifelong debilities. Charts with their Gauquelin Sectors must be time-exact.
Keyboard switch is shift + M.
The sectors (there are 36) are numbered clockwise from the Ascendant.
Michel Gauquelin conceived this division of chart areas, which has no burden of past associations, and used France's timed birthcharts to build huge databases. 'The Mars Effect' caused ripples, and drew the 'skeptical' part of the science establishment into a shameful attempt to shut him down, by bogus peer-review.
This feature uses chart #1 datum and chart #2 datum, but makes just one chart, using the House alignment of the Mainchart, chart #1, but displaying the planets of chart #2.
The keyboard shortcut is Alt+y.
Use shift + X to put the planets of chart #1 in the House alignment of chart #2 or press c to revert to Mainchart.
In terms of use, generally, expect to experience your susceptibility to their planets appearing in your 3rd, 4th and 5th Houses; your adjustment to their planets in your 6th, 7th and 8th Houses; your forbearance with their planets in your 9th, 10th and 11th Houses; and your identification with their planets in your 12th, 1st and 2nd Houses.
Even although it is a chart 'Having No Time or Space', Interpretations can be run on this chart, as Astrolog doesn't forbid even quite pointless exercises!
To see hits between the two charts, though, you need a Comparison Chart - see Multiwheels.
The Synastry chart may equally just rely on a 'Here & Now' chart at chart-thread #2 to supply a display of transits; check out 'Here & Now' and Chart #2 section, if you need to set up #2.
This is my favourite display, and can be called straightway with my macro F1, or a switch like this:

These fields replicate the last section of the Config. file, which does the same job (where, equally well, you can edit these paths).If you need to modify these fields, either:IN LATEST VERSIONS. the Directory-fields in the image above are the default paths in Astrolog32 V2.02, and all versions after. Though by default it goes to 'Program Files',
1. you have trouble getting Astrolog32 to find its charts, atlases, interpretations, miscellaneous or ephemerides folders..
2. you are setting up a new install, and want to direct its calls for atlases, ephemerides, charts, etc, to an earlier install or program, or another location for the folders.C:\Program Files\Astrolog32\.. (as seen), these versions should adjust to any location, and they will direct calls to folders, having amended these paths automatically. (but see third 'Directories' image)
Unlikely, but if you have moved your Astrolog32 V2.0x after install, (and certainly if you have installed V1.3x other than atC:\astrolog32 ), you will find you have to change these paths and save the Config.file (or, of course, move the Astrolog32 folder back to where you first chose, maybeC:\Program Files\.. , or in the older version, toC: ); then it can work.. (and you may need to re-make shortcuts toastrolog32.exe , to launch the program).
 Any paths that are not currently working, - either wrong, or where Astrolog32 is discovering the absence of folders which you didn't download (like say, It may help to look at the "Cannot find astrolog32.dat" help-page, here
IN EARLIER VERSIONS. note the difference with this set of Directory-paths (at right) - these are the default paths in Astrolog32 V1.30, and all versions before. These versions expect the program to be installed to a folder called\astrolog32 , at the rootC: , and they direct calls to the modular folders there.
If you have your Astrolog32 V1.3x anywhere else, you will have to change these paths and save the Config.file. Or, move the\Astrolog32 folder to the rootC: , so it can work (you'll need to re-make shortcuts toastrolog32.exe , to launch the program).

Lastly here are the paths for an english-language V2.04/5 install at C:.
Note that although the installer suggested the\astrolog32 folder would be at the root, in fact another folder, called\astrolog , needs to be interposed by you, or macros will not work.
Ideally, the extra folder is made by the Astrolog32 V2.0x installer during installation, but you can successfully create it now and park\Astrolog32 within it; but make sure the directory paths in your personalastrolog32.dat are correct.

There is a graphical & a text version, and only the text option is in [Lists]. The graphical, which is called by going [Charts] > [Local Horizon] shows the spread of the luminaries & planets around the ecliptic, pointing up their rising, setting and culmination, also quadrant and conjunction, - pressing 'p' for progression becomes a demonstration of the changing night sky, if Jump Rate is 'Hours'. As well, Fixed Stars can be incorporated in the image, and any planet bar the Moon set as the hub to the 360-degree view.
The text-list details angular position and time, rising, culmination and setting.
Fixed Stars can be included individually, or by [Settings] > [Include Fixed Stars], so can Uranians (this will be a very full list!)
You can call these pages via Alt+shift+L (not a toggle) for text, or shift+Z (not a toggle) for graphics.

This uses the world map to illustrate the culminated position of planets and points through the day in question. [Extra] > [Bonus Mode] shows longitudes where, at the chart's time, planets are at zenith.
The text version spells out the longitude of where, at the time in question each planet was on the midheaven and on the nadir, and the latitude of where the planets actually appeared at zenith.
The keyboard switch is shift+L.
Astro-graphology is a big topic, but curiosity's arrow has led me in other roads. It is extensively covered inHELPFILE.TXT , (as 'astro-graph' - note the spelling), and Wikipedia's Astrocartography page explains the topic too.
This feature is a text-file generated ad-hoc by Astrolog32 to describe personality traits that would arise, if the mainchart data was a birth-chart.
What interpretation-set you see is controlled by [Settings] > [Miscellaneous], where there are two permutations of interpretation-sets to choose from (on the right of the dialog's window). (With V1.3x, seeing any 'alternative' interpretations at all depends on whether you have downloaded the 'Interpretations ' zipfile and extracted it to where Astrolog32 expects it to be,\interpretations .)
- The standard interpretations are a list of planets read according-to-Sign-and-House, without regard to aspects. These are the Interpretations presented by default: clicking [Lists] > [Interpretations], (Alt+shift+capital I), will put up a copyable text-list.
- Alternative interpretations are only available on request, then, and include an automated estimation of relative power, and adjustments for the effect of major aspects - these come from files you can edit to your own purposes: they rely on Valentin's sequencing, which is hidden in the program. Files
pl01.dat thro'pl10.dat reference Sun thro' Pluto, I discover, andpl22.dat, pl25.dat, pl28.dat, pl31.dat cover Ascendant, 4th, Descendant, 10th.
If you select 'alternative' in the [Settings] > [Miscellaneous] window, you can choose one of six different levels of editable alternative interpretations, and going 'OK' to an option will deliver your selection during the current session, choosing from:
1. default - 'Info Only'.
2. Each planet's quality defined individually.
3. Each House's quality defined individually.
4. Each House's quality defined in terms of its dispositor.
5/6. All Houses' and planets' qualities defined individually, and default readings, less/with their dispositions.
It isn't possible to make the alternative selection the default selection.
These interpretation snippets are generally held to serve well as prompts to the astrologer, rather than anything like an integrated perspective on a particular chart; the 'Interpretations' make little of aspects, and much of House and Sign, as it avoids complication. As Interpretations now bind the name of the native into the reading, then 'last names before first', or ANY other comments in Astrolog's 'hidden' name will seem absurd when you read through any interpretations provided! - so open [Edit] > [Edit Mainchart Data], and edit the 'Name' line, before calling Interpretations.[Extra] > [Constellations On]This sets the maps on, but with an outward perspective: so does shift+F, a toggle that thereafter only switches from skymap to earthmap.
Other triggers for maps are shift+G - delivers Equatorial Globe or Equatorial Constellations, and shift+P, [Extra] > [Show Polar Globe] / [Polar Constellations], sets to the South Pole - press i for North Pole.
In all cases, shift+F switches from looking in to looking out.
All these maps can be modified, by going little 'i', or little 'p'. Bonus Mode incorporates the planets, in graphics mode, with these [Extra] options ; it is a toggle more handily driven by the keyboard switch letter 'i'.
[Extra] > [Modify Chart], (number 'zero') functions differently in different modes: Specifically, if in wheel chart mode it will toggle between the standard wheel and the house-emphasized wheel.

In addition, it will toggle the "horizon chart displays with polar center" flag from the Chart Settings dialog, with the "world map in Mollewide projection" flag from the Graphics Settings dialog.
Toggle 'p', and trying [Extra] > [Globe Tilt] > [any value to increase, ] [ to decrease, ] can have the globe rolling everyway, as well.
[Extra] > [Calendar] leads to two options for viewing: relevant Month or relevant Year.These pages have scrollbars, but do not scroll in this option, so if you are (say) counting days beyond a year's end or start, you can't scroll to the next/previous year. Instead, progress the calendar, using the ^ keyboard switch (shift+6) for 'progress by years', then the 'p' keyboard switch.
The keyboard shortcut for Calendar is Shift+K, which then also toggles between the 'Month' and 'Year' view.
Escape by way of shift+V.
[Charts] > [Ephemeris] - this displays a text or graphic page - the midnight positions of planets and points for each day in the month which the Mainchart-data falls in.
Shift+E calls the same thing. The toggle ' v' switches to/from a 'graph' version which itself is handy for a overall, if simple, take on the month's conjunctions.
For years rather than months, only the command-line will serve - go [Run], type in-Ey , press Return
For controls of what gets displayed, see example of switches for printing off the ephemeris here; it shows midnight positions.
For years where the quality Swiss Ephemeris files are not installed, less accurate databases (Moshier - 3000BC to 3000AD - the Matrix routines which generate the Asteroid data anyway), will fill in the planets' positions on all versions of Astrolog32.EPHEMERIS SOFTWARE:
TROUBLESHOOTING EPHEMERIDES:
Because other (hidden) ephemerides step in when the relevant Swiss Ephemerides are absent for a particular era), there's no real way of knowing if your chart has been served by those hidden files, as they are wrapped within the executableastrolog32.exe ; although you may see the Swiss.se1 files in\ephemeris folder, any error in the Config. File's path to that folder will interrupt their use.
OBTAINING EPHEMERIDES:
Clicking DOWNLOADS (link also at the head of this guide), and clicking the 'click here for English' flag, can lead you ultimately to Astrodeinst's 'sweph' page, for Swiss Ephemerides, where, click on zip-files you want, download them to your desktop, and unzip the contents (.se1 files) into the folder\ephemeris .
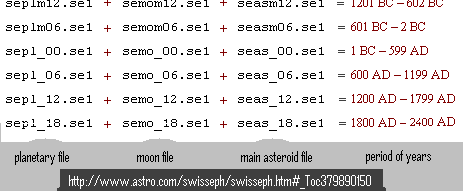
Of interest for charting the past, the following zips create the files you see on the right:
sweph_00.zip , &swephm_00.zip : 2BC to 599AD.sweph_06.zip , &swephm_06.zip : 600 to 1199AD.sweph_12.zip , &swephm_12.zip : 1200 to 1799AD.sweph_18.zip , &swephm_18.zip : 1800 to 2399AD.sweph_24.zip , &swephm_24.zip : 2400 to 2999AD.
But remember, you already have the contents ofsweph_18.zip , &swephm_18.zip , covering 1800CE - 2399AD.

[Calculation Settings] > Central Planet...(Sun, Mars, Venus or other...) renders data as centred elsewhere in the Solar System, (with the exception of 'Moon' as an option). Type the planet's name in the field where 'Sun' is shown, or use the following numbers:
0 for Earth, 1 for Sun, 3 for Mercury, 4 for Venus, 5 for Mars, 6 for Jupiter, 7 for Saturn, 8 for Uranus, 9 for Neptune, 10 for Pluto.
.. this illustration charts the craft "Curiosity" landing on Mars, and is a 'Null' chart as far as any zodiac goes.
.. such charts will print and copy for export OK, and will save as a.dat file or image or text, but not usefully as a_pos.dat : when a saved chart is re-opened, the central planet or luminary, where it's not the Earth itself, must be re-set via [Settings] > [Calculation Settings] and this won't work with_pos.dats , so only.dats should be used.
An useful switch may be [Settings] > [Chart Settings] > Display Format... Choose Longitude 360 decimal deg., go
It will be appropriate to suppress Minor Objects & Points by going 'No Selection' in [Settings] > [Object Selections]. A carry-over from the program means that the Earth's Zodiac still appears around the chart, unless you choose [Charts] > [Gauquelin Sectors]. It's made me think - can anyone know what zodiac applies on Mars! NOTE: The glyph for our Earth is a circle, with an upright cross in it - see images. An alternative view of the Solar System is available with [Charts] > [Solar System Orbit], or Shift+S, (not a toggle). This view suggests the orbital distances as seen at 90 deg. to the Solar System, for any given time. Pluto, for its distance, is often out-of-range.
astrolog32.exe as a right-mouse click option, Astrolog32 won't open with the chart you've highlighted in a folder window, as other programs do. You can only open & alter .dat-files using Notepad, from your right-click options list; unless, that is, you want the ability to open.dat files with Astrolog32 enough to jump through hoops to obtain it; I am much endebted to Michael Rideout at 'Astrolog_List' forum, for explaining this dodge:DODGE No. 7
If it weren't that Astrolog32 uses.dat files, - an universal text-format used by Windows© and countless other applications, this would be just a case of setting the executableastrolog32.exe as a right-click option for.dat files, then making all.dat files amenable to it.
It woud be rash to suggest such a radical action, because.dat files are used by many other programs.
Instead, this dodge entails using a new suffix, not .dat, then tweaking Windows© to accept it.
To benefit, you will have to save in future using the new suffix, also choosing "All Files" in the "File of Type" field; and optionally, duplicate all your old Astrolog32.dat files to a new folder, and, as a batch, convert their file-extension to, say,.A32 - .. then, populate your\charts folder with these A32 versions.
Or you might just keep your.A32 option for special charts! - you can put them in any folder & open them with a right-click "Open with.."!

This is the procedure in Xp:
Decide on an unused file-extension, such as Michael's.A32 ending (lists are available on the web of file-extensions already in use).1. create a duplicate of aNext the executable:.dat file, on your desktop, rename ityourchart.dat , and change the name to show the new file-extension (this example uses .A32 ~ so,yourchart.A32 ).2. Double-click 'yourchart.A32 ', to try to open it - a dialog box appears ;
3. Click 'Select program from a list', and click 'OK' ;
4. Make sure the 'Always use the selected program to open this kind of file' tickbox is checked ;
5. Click 'Browse..', and navigate into\main folder within Astrolog, and highlight theastrolog32.exe file there ;
6. Click 'OK' ;
7. Close Astrolog32! - it will have opened with an 'Here & Now' chart ;
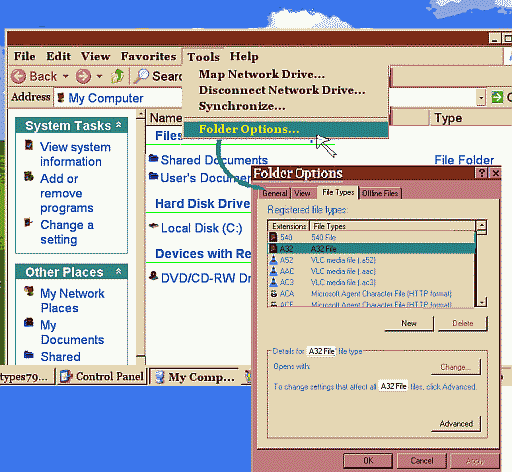
Last, the new type of file's properties are altered:8. Open 'My Computer' ;
9. On the menu, select [Tools] > [Folder Options] ;
10. Click 'File Types' ;
11. Select 'A32', and click 'Advanced' ;
12. Highlight 'Open..', then select 'Edit..' ;
13. Put your cursor in the 'Application used to perform action' line, press 'end' key. Leave one space after "..olog32.exe", adding "-i", (with the quotes), & leave another space before "%1". (Image below) ;
14. Save, and exit ;
15. Double click onyourchart.A32 , and it will open in the program.
The 'Celebs' download consists of a starter pack of charts, 1724 currently, of mostly Italian, United States', and International notables - all .datfiles with with good time data, at least at first appearance - however, with a large number, the timezone has not been set right or at all (correct some with my World Time-Offsets page).
All charts are named surname-first, so that they can be made alphabetical order lists in a Windows© search. Find them at Robbie Luporini's site here.
There's a potential nuisance value to putting them into\charts as.dats : in mingling with your charts, they take over the\charts folder, - anything newly created by you won't be found among them, except when listed in time order: better in their own separate or sub-folder!
Pretty good chart data of well-known people can be browsed at Rodden's Databank at Astro.com, but charts there are not .dat files.
INSTALL V2.0x
If you need an install that's a breeze, and want to avoid any likelihood of re-writing paths, it takes only five minutes to have running R. Luporini's latest version, currently 2.05. It downloads in a compressed, self-extracting/installing file calledAstrolog32_v2_05_setup.exe .
Click the A32 DOWNLOADS link at the head of this guide, choose 'click here for English', scroll down and click on the links in blue, "Astrolog32 V2.05".
If you do your computing offline, you can import the self-extracting installer on removable media.Runs on Win'98, Millenium, 2000, Xp, Vista, Windows 7, Windows 8.1.
Under Xp, Vista, 7, 8, be wary of installing as Administrator.
..if you want to run Astrolog32 as a user..
In the package you will get the program, the ephemerides for our current era, macros to seek out, one sample chart, this guide and the old helpfile, and the atlas files for U.K./Commonwealth countries, plus Ireland. Because the U.S. atlas files are so big, state.atl files must currently be sourced separately and dropped into A32's folder..Astrolog32\atlas\american .. after your install is done.Astrolog32_v2_05_setup.exe ...
This is a software that customises itself to your choices, so the installer hits you with 'Wheres?' almost straightaway as it configures itself:and use Searchbox, picking 'the USA', then 'Birth town', for your town's co-ordinates.., then ~ [Next]..
- 1. pick your native language ~ easy... & a Setup wizard appears
Welcome to the Astrolog32 setup Wizard! ~ [Next]..- 2. License Agreement ~ choose 'Accept' button ~ [Next]..
- 3. accept, or browse to, a destination for the install ~
C:\Program Files is a safe choice but if you like running macros (about, see MACROS section), you must instead create a folder at "C: ", namedastrolog , (a little compiling!) - then navigate the Setup to thatC:\\astrolog - (go [Browse]), - - and maybe re-write the filepath to readC:\\astrolog ...
At CONFIRM (step 5 below), installer will come back with the right pathC:\\astrolog\astrolog32 . ~ [Next]..- 4. accept, or browse to, a destination for the program's shortcut ~ easy ~ [Next]..
- 5. Both paths CONFIRM..INSTALL? ~ [Install]
- ... installs...
Alerting Dialog, preparing you for the next option, statesImportant notice
In the following setup, to set the default town use the installed atlases; but if your town is located outside these countries,
then to use the appropriate atlas file you will need to download it and unzip it into the correct one of the two 'atlases' folders - either
...\Astrolog32\atlas\american (USA states only), or
...\Astrolog32\atlas\international (everywhere else).
To get atlases files or folders, go to
<http://www.southville.net/astrolog32/en/atlas.html>- 6. choose a town you make most charts in ~ unless you chart in London, click Call Atlases, and select 'International'.. see here for a guide to working the atlases' window.. but U.S. users! either 1. just click 'London' for now, collect your state-file later, and amend! ~ see what's involved, first here, Obtaining Atlases...then, next here, Changing defaults OR 2. if online right now, Google-for-and-enter co-ordinates for your home-town..'XX:xx'xxW( or E)', 'XX:xx'xxN( or S)' in the appropriate fields, type your town's name in 'Location'; OR, browse to www.astro.com/atlas
7. what timezone you are in ~ Brits installing V2.0x! you are NOT in zone -1, change to 0! - that -1 is a European default!
.. if not in the default timezone, open 'Times' page, to find how many hours, + or -, to enter ~ [Next]..Directories' paths offered for checking ~ [Next].. 8. simplified or advanced mode? ~ you choose, you can change later ~ [Next].. 9. click [Finish] and it launches, with a pop-up; when you click 'Save', all your choices are written to astrolog32.dat ~ for future reference; do that, and the install is complete. (..It is a weird feature of this legacy-ware - so accept the profferedastrolog32.dat . If you don't, you will still have to on re-launch!)
If you install at the root To get Astrolog32's 'full works', you will want, later perhaps, to expand the atlas to or beyond your home country or U.S. state, or use past centuries of ephemerides for seriously historical charts: these will mean, in the first case, downloads of V1.30, latest of the V1.3x releases, is typical of the programs pre-V2.02, - it downloads as a zip file,Astrolog32v134en.zip which with Win'98 will need to be extracted with a program like Winzip©. And here the difficulties arise: unless you know how to re-write the paths inastrolog32.dat (not a hard thing to do, but unfamiliar!), then it must unzip its contents to the folder it regards as default (a situation which modern users may be caught off-guard by because Winzip© offers the choice of other destinations..).
Even with modern Windows©, I advise to make that default folder now, at the root folderC: , viz:
C:\astrolog32 Runs on Win'98, Millenium, 2000, Xp, Vista, Windows 7, Windows 8.1.
Under Xp, Vista, 7, 8, be wary of installing as Administrator,
..if you want to run Astrolog32 as a user..
Your download site is southville.net, but first, take in the clear advice in the Readme that Chris provides in the Readme - essentially, you must make the folder beforehand to hold it, atC: , unzip it there, and find your own atlas-file(s) after install.
NOTE: a 'Chrome' browser may, spuriously, flag this zipfile as a possible malware vector! ..take no notice, and do read any "You are about to download" dialog-box target-line carefully; I write this because what may happen (using WinZip) is that the unzipped files may otherwise go, with a mind of their own, to the root folder - you will find the root folderC: in 'My Computer', - and they'll hide at the bottom of the list, (and, as I never expected it to go there, I never did find my first Astrolog download! -it sat there, unpackaged, for years).
Double-clicking on the zipfile in Xp and after in the absence of Winzip© and the like raises an 'Open With' dialog box - choose 'Compressed (zipped) folders' and go OK - another window opens with the contents in a sham folder - go Ctrl+a, Ctrl+c, and then paste the three folders in the 'Astrolog32' folder. This is easy; a Good Result! Open\main , and double-clickastrolog32.exe ...see on:Welcome to Astrolog32! , below..

Just to digress regarding Winzip, double-clicking on the zipfile calls Winzip© in my pc, ( in WIN98 and before, no unzipper means you will get 'Windows cannot open this file' warning..); using Winzip's 'Classic' mode, it shows me the contents; clicking 'Extract', an 'Extract to..' path is displayed (see right), and with Winzip, it's almost always the wrong path: it may need to be changed. Here's how to get it right..
..'Browse' is the little icon to right of the path, and clicking it, a small 'Browse' window opens, choose My Computer, click onC: , and locate and highlight\astrolog32 (which you have created), as your target, ...then click 'Extract':
... in a moment, three folders are created, with the contents you saw in Winzip's preview, but all in their right folders:\main ,\atlas , and\interpretations ... no others yet.
Nevertheless, the copy ofastrolog32.dat dormant in V1.30 is ready to be written to\main when you click [Finish], and then click 'Saveastrolog32.dat '; - the\charts ,\ephemeris and\miscellaneous folders will there-and-then be added.
Open\main , and double-clickastrolog32.exe ....
Welcome to Astrolog32! ~ it continues with geekspeak the Configuration files could not be found ~ which, ignore..
This is a software that customises itself to your choices, so the installer hits you with 'Wheres?' almost straightaway as it configures itself: read each dialog carefully, making the best you can, for the present, of 'Default Location & Timezone' (if online, enter your birth-town in the searchfield at this page, for your co-ordinates); now you'll see Alerting Dialog, preparing you for the next option, - it statesImportant notice
In the following setup, to set the default town use the installed atlases; but if your town is located outside these countries,
then to use the appropriate atlas file you will need to download it and unzip it into the correct one of the two 'atlases' folders - either
...\Astrolog32\atlas\american (USA states only), or
...\Astrolog32\atlas\international (everywhere else).
To get atlases files or folders, go to
<http://www.southville.net/astrolog32/en/atlas.html>
Accept 'Directories' (by default, they should look like these); when you click 'Finish', all your choices are written to the yet-to-be-born fileastrolog32.dat ~ for future reference; you are asked to OK that, and the install is complete for now. (..It is a weird feature of this legacy-ware - so accept the profferedastrolog32.dat . If you don't, you will still have to on re-launch!)
Opening\atlas , the two folders inside hold only the reference files,country_list.atl , andstates_list.atl . There are no atlas files in the download, so get your home's co-ordinates, or look up a city near you - either below, or if abroad, in 60 CITIES - so you can insert them either during the initializing of the software, or through [Settings] > [Set default loc.] menu later.UK timezone = 0 | London 51.30N 0.10W | Cardiff 51.30N 3.12W | Manchester 53.30N 3.15W | Glasgow 55.50N 4.15W
Durham 54.46N 1.34W | Dublin 53.20N 6.15W | Ottawa 45.25N 75.42W | Adelaide 34.56S 138.36E | Dunedin 45.52S 170.30E
After the install, or even before, go to atlases at southville.net and download atlas zip-files one-by-one as required, ready to be unzipped into their appropriate\atlas folders.
Troubleshooting: here's a link to a FAQ.. To install V1.3x in a folder other than at C:, the whole of this section of 'Customizing the Config.file' may help, here. Other flavours of Astrolog32: T. Kubec's self-installing V2.02, a precursor to V2.05, is available at orionsoft. ONE FOR U.S. STATES, ONE FOR EVERYWHERE ELSE
Both of these service the filling-in of new chart-data, when you have the [Edit] > [Edit chart data..] dialog box open. Also they are on call when resetting your own default location in [Default Info], (arriving from [Settings] > [Default Location/Timezone], Alt+d).
In [Edit] > [Edit chart data..], when you click on a [Call Atlas] box, it presents you with fields to to click on, then fill in.
Then, so long as you have the two Atlases installed, the Longitude, Latitude & Name fields will be filled in for you.
At 1 in the image below, default search is USA, so if you want International, click to that choice first-off, then select the Country. For USA, it's State that must be selected first. Continue to follow the arrows..
NOTE: the atlases are quite unconnected with the timezone selection, which must be done manually.
At 2, jumping to the Country, or State (US). The lists of all countries (states) are too long to scroll, and keying the first letter of the country's (state's) name in the field makes the list scroll down closer to your target: the 'down' arrow-key take you the rest of the way. Proceed to 3...
At 3, to browse for a placename (city, town, village), try the first few letters only, and the atlas will filter you a manageable selection. Further clues in the listings may include the zone of the country (international), or state county zone (american), - each atlas has also its own filter, in 'Advanced Settings' (more, see below). If this doesn't unearth your place, you can browse all the locations in any State or Country in Blocks; that you may start with the First Block, the Middle, or the Last, is an useful option when, in Texas, the First Block only runs from 0 thru' B!

, at 4, you must use the 'Search Atlas' rectangular button to raise the list of possibles.
To finish: after highlighting the location you want in step 5, you click 'OK' (6); - the "Use first part of feature name as Chart name" box (top right), can save a bit of typing.
Both Atlases are very extensive, and, if you have TimeZone data to hand as well, you have a terrific tool for chart-making. Much credit to Antonio Ramos!
You don't have to use the atlases - typing in co-ordinates in the relevant fields in the [Enter/edit.. data] window, and inserting some name in the Location field, works fine. In the atlas name field, putting any accented letters will confuse it, the same goes for apostrophes although they may appear in the name you get back. It is also true that you can add to these atlas files, inserting your own particular locations: the Whether you have just one, sixty, or lots of states' or countries files in your atlas folders, you also must have, in  I have re-editted Antonio's US atlas in a 'speedy' version - the schools, beaches, malls, golf courses and such I have mostly editted out, as they are duplicating 'town' entries, or else deserted. You may find this atlas in 2018. If you have these files, you will see the suffix is To cut out the unnecessaries, by choosing 'Advanced Settings', any group of entries (apart from 'civ', 'ppl' and 'loc', say), can be hidden for your work-session. Where Puerto Rico is concerned, Spanish word-order greatly thwarts alphabetic searches, as the descriptors come first in Spanish, (e.g. Centro Xxxx, Residencial Xxxx) : better to open NOTE: An unique feature of the US states' atlas currently is that at first glance, small, even quirky private places are shown alphabetically, and towns, cities and villages are among them: towns, villages and cities proper are also in isolated sequences in the listings, hived off by their being prefixed. So here's the trick:
 To go straight to all Villages, Towns or Cities, in an US state:
In 'first letters', type 'City of' without the quotes, click 'Search Atlas' and scroll down - all cities in a state are listed in sequence;
Or, likewise, type 'Town of', or 'Township of', without the quotes, and scroll down - all towns in a state are listed in sequence. Other sequences are 'Borough of...' (Pennsyl.), 'Village of...' (Delaware, Florida, Illinois, Mississippi, Nebraska, New Mexico, New York, Ohio, Texas, Vermont, West Virginia, Wisconsin): 'University of...' gives inconsistent results, - try it, but then commonly-used names of universities.
To go straight to all Villages, Towns or Cities, in an US state:
In 'first letters', type 'City of' without the quotes, click 'Search Atlas' and scroll down - all cities in a state are listed in sequence;
Or, likewise, type 'Town of', or 'Township of', without the quotes, and scroll down - all towns in a state are listed in sequence. Other sequences are 'Borough of...' (Pennsyl.), 'Village of...' (Delaware, Florida, Illinois, Mississippi, Nebraska, New Mexico, New York, Ohio, Texas, Vermont, West Virginia, Wisconsin): 'University of...' gives inconsistent results, - try it, but then commonly-used names of universities.HAVING A LOOK INSIDE AN.ATL
Atlas files in\international begin with@0500 - you will see this if you open one in Notepad - and if a nation has administrative regions, these are then listed, with their two-letter codes; below, each actual location starts with size-indicators (N,V), dashes, then co-ordinates; any admin. code; only then the locations' names are gazetted, alphabetically.
Atlas files in\american begin with@0600 . Digging into the 'state' file of a typical U.S. location, uprights and separators in the string give an order for the program's routines to follow:.. where, "Feature" is a place in the atlas. It can be a town, village, hospital, school, etc.. "Cell " means a geographical region where the feature is found.
type of Feature |Feature Name |Cell Name |County Name %Search field @longitude latitude |altitude
To add a location, - say you are monitoring lightning strikes on Pikes Peak, just west of Boulder, but closest is 'Gillett' - use much of Gillett's string, change the co-ordinates, and the name, but above all, keep the number of separators, viz:
ppl|Gillett (historical)|Pikes Peak|Teller|105w07.22|38n46.55|3029
loc|Pikes Peak|Pikes Peak|Teller|105w02.39|38n50.26|13895
It has become a fashion in Wikipedia and elsewhere, when giving co-ordinates, to express parts of a degree in decimal: To left and to right is a converter, decimal to minutes-of-arc, in one-minute stages.
For charts at latitudes north of 67 degrees N., or south of 67 degrees S., you will get "The Koch (or Placidus, or other) system of Houses is not calculated at extreme latitudes". Still I find after 'OK'ing these warnings a chart appears, which may be serviceable, before the program crashes.TYPICAL ATL FILE
--------------------- --------------------
COUNTRY FILES: HARD-TO-FINDS
My Hard-to-Finds include: Yerushalayim (Jerusalem) is listed in the country No Mans Land, but it's not a primary location in Israel; many parts of the city are however listed in Israel file. Also, Babylon is absent when so spelled: it's "Babil", the in Iraq country file. Nuremberg, so spelled, is not in the Germany file, where it is Nurnberg.
Nizhne Novgorod fails to appear in the Russia file, but other spellings do, e.g. Nizhniy Novgorod.
The Baikonur Cosmodrome is at 45n58 63e18, the Kennedy Space Centre is at 28n35 80w40; the Wenchang Space-Launch site is at 19n41 110e57, .the Xichang Launch site is at 28n15 102e02.
Crna Gora is also called Montenegro, and its locations are in 'Serbia and Montenegro.atl '.
In Brazil alone there are 36 locations called Sao Paulo; mostly though, it's the mega-city that's at issue, which is at 23s32 46w37.
Channel Islands: two of these islands (Guernsey and Jersey) appear listed separately in atlas\International, reflecting their largely-autonomous status. Alderney's locations are in 'Guernsey' file: Sark is 49n26 2w22.
Isle of Man: towns and villages are, like the Channel Islands, listed separately in atlas\International.
Holy Island, (Northumb. UK), is absent: Lindisfarne Abbey, the only location, is 55n39, 1w36.
Ulster: towns in Northern Ireland are in the United Kingdom atlas file.
Isle of Wight, Scottish Western Isles, Orkneys, Shetland, and Scilly Isles are represented in the United Kingdom atlas file.
Ireland: locations do not include the Aran Isles: Inishmore, 53n09, 9w40; Inishmann, 53n05, 9w38.
Corsica: in the France country file; e.g. Ajaccio.
France: locations include some islands' villages: Noirmoutier, Ile de Batz, Porquerolles, Oleron, Sables d'Olonnes, Bel-Air, Groix ..(search both Ile, L'Ile,); ~ but not, apparent to me: Belle-Ile, 47n20 3w11; Mont St. Michel, 48n38, 1w31; Ile de Re, 48n46, 1w25, L'Ile d'Yeu 46n43 2w21, Huelgoet, Verdelet...
Elba, Sicily, Sardinia: in the Italy country file.
Azores, Madeira: in the Portugal country file, e.g. Lajes; Funchal.
Balearics: in the Spain country file; e.g. Santa Eulalia, Palma de Mallorca, Mahon.
Canary Isles: in the Spain country file; e.g. La Palma, San Cristobal, Las Palmas de G Can., Puerto del Rosario.
The Greek Archipelagos: some names of towns differ from common English usage, but islands can be pinned down by their main towns, all in the Greece country file: Amorgos: Katapola ; Andros: Andros; Crete: Irakleion; Karpathos: Karpathos; Khios: Chios; Kos: Kos; Lesbos: Molyvos; Limnos: Myrina; Mikonos & Delos: Mykonos; Milos: Adamas; Naxos: Naxos; Rhodes: Rodos; Samos: Samos; Sifnos: ?; Skiathos: Skiathos; Skiros: Skyros; Skopolos: Skopelos; Siros: Ermoupoli, Syros; Thera: Akrotiri; Thasos: Thasos.
Cyprus is neither in the Greece nor Turkey country files, but listed as a separate country.
U.S.A.: Johnson Atoll, Palmyra Atoll, and Baker Island are listed under "Minor Offshore islands of the U.S.A.", in atlas\American.
NOTE: Recent political changes: South Sudan has come into existence, but its towns will be found still in Sudan country file. Parts of Ukraine have been absorbed into Russia, but will still be listed in Ukraine. Kosovan towns are still listed in Serbia. Absent from \international listings are Aruba, Curacao and Sint Maarten ~ pre-2010, all their towns were parts of "Netherlands Antilles" (which is in the countries_list - find there also the remaining municipalities, the so-called "B.E.S Islands", which remain under the Dutch government.)
--------------------- --------------------
Users of versions V2.05, V2.02, and before, may need to populate their atlas folder with at the least their preferred country's file before they can abandon the 'nearest choice' offered in the installation's setup.
Users of versions V2.05 have five Anglophone country files all ready to choose from, but it may not be their country of residence, so again a visit to Southville will fix it.
NOTE: English-speaking users still in fact have the Belgium, France, Luxembourg, Monaco, Switzerland & Italian country-files, with V2.05, as the installer serves these users as well; just self-extract Astrolog32 again to the Desktop, choosing 'Francais' or 'Italiano' language, delve into the '..atlas/international ' or 'atlante/internationale ' folder it has created, and copy/paste thefr.atl orit.atl file you find in there to your english 'atlas/international' folder. Delete the install from the Desktop. (To the curious - the french & Italian keyboard-shortcuts differ from ours, and the Czech installer is problematic).
Users of versions V2.06 onwards are set to have ALL U.S. files and anglophone countries' files.--------------------- --------------------
60 CITIES
If short of a country-file, these locations might approximate:
|
City & .atl code
| A32's adjustment to UT
| Co-ordinates (to 0.5 DECIMAL)
|
| Americas, Africa | Bloemfontein. sf.| UT-2 | 26e29s | Khartoum su.| UT-3 | 32.5e15.5n | Mombasa ke. | UT-3 | 39.5e4s |
| Abuja ni. | UT-1 | 7.5e9n | Bogota co.| UT+5 | 74w4.5n | Kinshasa cf.| UT-1 | 15.5e4.5s | New York NY| UT+5 | 74w40.5n |
| Algiers ag. | UT-1 | 3e37n | Buenos A. ar.| UT+3 | 58.5w21.5s | Los Angeles CA| UT+8 | 118w34n | Punta Arenas ci.| UT+4 | 71w53s |
| Arequipa pe.| UT+5| 71.5w16.5s | Cairo eg.| UT-2 | 31e30n |
Lusaka za.|UT-2 | 28e15s | Sant.Domingo dr.| UT+4 | 70w18.5n |
| Belem br.| UT+3 | 48.5w1.5s | Chicago IL| UT+6 | 87.5w42n |
Memphis TN| UT+6 | 90w35n | Valparaiso ci.|UT+4 | 71.5w33w |
| Belo Horizo. br.| UT+3 | 44w20s | Jacksonville GA| UT+5 | 83w32n |
Mexico Cy mx.| UT+6 | 99w19.5n | Wichita KS| UT+6 | 97.5w37.5n |
| Europe, Balkan, Ukr. | Bern sz. | UT-1 | 7.5e47n |
Lisbon po. | UT | 9w38.5n | Skopje mk. | UT-1 | 21.5e42n |
| Amsterdam nl. | UT-1 | 5e52.5n | Cluj ro.| UT-2 | 23.5e47n |
Ljubljana si.| UT-1 | 14.5e46n | Stockholm sw.| UT-1 | 18e59.5n |
| Barcelona sp.| UT-1 | 6.5e41.5n | Gibraltar gi.| UT-1 | 5.5w36n | Odessa up. | UT-2 | 30.5e46.5n | Stuttgart gm. | UT-1 | 9e48n |
| Berlin gm. | UT-1 | 13.5e52.5n | Kiev up. | UT-2 | 30.5e50.5n |
Riga lg. | UT-2 | 24e57n | Warsaw pl. | UT-1 | 21e52n |
| Asia, Mid.East, Russia | Delhi in.| UT-5.30 | 77e28.5n |
Jakarta id. | UT-7 | 107e6s | Moscow ru. | UT-4 | 37.5e56n |
| Ankara tu. | UT-2 | 33e40n | Djibouti dj.| UT-3 | 43e11.5n |
Karachi pk.| UT-5 | 67e25n | Mosul iz. | UT-3 | 43e36.5n |
| Bangkok th. | UT-7 | 100.5e14n | Guangzhou ch.| UT-8 | 113e23n |
Krasnoyarsk ru.| UT-6 | 93e56n | Riyadh sa. | UT-3 | 47e38.5n |
| Beirut le. | UT-2 | 35.5e34n | Saigon vm.| UT-7 | 106.5e10n | KualaLumpor my.| UT-8 | 101.5e3n | Rostov ru. | UT-4 | 38.5e47n |
| Beixing ch. | UT-8 | 116.5e39.5n | Honolulu HI| UT+10 | 158w21.5n |
Manila rp. | UT-8 | 121e14.5n | Teheran ir. | UT-4 | 51.5e35.5n |
| Calcutta in.| UT-5.30 | 88.5e22.5n | Izmir tu. | UT-2 | 27e38.5n |
Miraj in. | UT-5.30 | 74.5e17n | Tokyo jp. | UT-9 | 140e35.5n |
TROUBLESHOOTING ATLASES:
If clicking the button "Call Atlas" (in the [Edit] > [Main Chart Data] dialog box) doesn't work, either the program is looking for\atlas on the wrong path, or you haven't got the right files in the folders:
- 1. be sure that there is at least
country_list.atl file and one other .atl file in the\international folder; and, at leaststates_list.atl file and one other .atl file file in the\american folder.
Older releases came with nothing! NOTE that without thecountry_list.atl or thestates_list.atl , the atlases cannot work however many other .atl files you install.- 2. see if one of the last lines of
astrolog32.dat steer the program to those folders (read the lines which start with:DIA and:DII ); see the [Directory Settings] section in BASICS #3/Directories. Or read CANNOT FIND CONFIG. FILE help-page.
OBTAINING ATLASES:
NON U.S.: for individual 'country'.atl files, open..\Astrolog32\atlas , open your\international folder, opencountry_list.atl in Notepad, and look up the code for the country-file you want, always somename.atl ; check that it is absent from the\international folder.. ifcountry_list.atl is absent, download that first!
U.S.: for individual 'states'.atl files, open your A32 folder, open..\Astrolog32\atlas , open\american folder, openstates_list.atl in Notepad, and look up the states-file you want, always somename.atl ; check that it is absent from the\american folder.. .. ifstates_list.atl is absent, download that first!
Now Southville hosts an excellent 'Atlas' helpfile, here, a must-read to help you..
then navigate to Atlases at Southville.net, and pick your state's or country's file. Download and unzip to the correct atlas folder.
Another site is Astro.com's atlas, available through the [Help] menu in V2.05.
Or finally, try Roberto's site, and click on Atlante mondiale, (International), or Atlante USA (American), or both, select language and download a.zip of all countries or all states to a \downloads or \temp folder: then unzip their contents, each batch into the appropriate\atlas folder; (but these batch-downloads, both together, will take up 172MB!)
GEOMETRY: in graphical mode:
[Extra] > [Modify Chart] shifts the Chart Angles, squeezing some signs within the Zodiac circle, and stretching others, so that the Vertical appears at right-angles to the Horizon. A toggle switch does this as well, a zero ('0'). The two options in [Charts] menu, [Standard Wheel/List], and [HouseWheel] toggle the same difference.
Colour Size
Fancy
Saving
Printing
& Text
Other
--------------------- --------------------
COLOUR: in graphical mode:All windows now appear by default with a white background but, before v2.02, Astrolog32 has a blue background.
These and all other colours can be changed in the Configuration File, in the ;DEFAULT COLORS listings, (but back upastrolog32.dat first, into\miscellaneous ).
Check out the Colour Numbers, (image to right), for use with command switches and in Config. file.
Otherwise, use the more modern [Settings] > [Color Settings] dialog - see 'CHANGE MAIN COLORS via DIALOG BOX' below.

Colour Selection groups of the chart and text, as managed in the Config.file, are:
- 'Corner Decoration'. Off by default, see here to reset. For a taster, try altering this first, using Colour Numbers (image above) in the
-Ykc line.- 'Main Colors', at
-Yk line: see below- 'Planets and Points', according to 'Element' (Airy, Earth, Fiery, Watery): line
-YkC , see right..- 'Aspect-lines', according to choice; for their sequence: line
-YkA , see right..
CHANGING THE 'MAIN COLORS' etc via CONFIG. FILE:-Yk 0 8 , saving, then re-launching, so this method can't be an in-session tweak.
Pre-V2.00, the default '4 ' (after the-Yk 0 8 (twocharacterspaces)15 ), in 'Main Colors', is responsible for that dark blue background; back up first, then change '4 ' to '2 ' .. That '2 ' is a dark green, .....rather hohum..CHANGING 'MAIN COLORS' etc via DIALOG BOX:
.. maybe black? For black, put a zero. And saveastrolog32.dat .
With this dark background, you will need to change the other default items' colours which are set already to '0 ', or else they'll disappear; and saveastrolog32.dat .
That suggested setting of the background to '2 ' would make any green objects on it already defined as '2 ' disappear.. so, the 'Default Colors' are best changed after due consideration of all the element-colours of objects and points.In V.2.02 onwards, the numbers differ, but the procedure is as above; and the same suggestion - back up first: in the line beginning
-Yk 0 8 (twocharacterspaces)0 15 7 8.. ..skipping the initial0 8 , then0 sets the lines, then15 the white background, then it's degree markers, then lettering..
The image above, right, is of a very modified DEFAULT COLORS configuration - it will result in the chart at left.
..theYk ,Yk0 andYkA lines are similar: the first two numbers in each string are skipped because they are range parameters, (about, see WORD LOOK-UP).
Any new colours you choose will not subsequently update to become the default colours on the left; Black, White & Red, the first three for instance, are just reminders of the installation-defaults: the first three are always 'lines-colour', 'background-colour', and 'degrees-colour'.
However, you must go [Edit] > [Edit configuration file], and save, to make the change permanent.
While dark colours have less glare, a white background uses less ink. Use keyboard keys 'm' then 'x' (these are toggles) to thin out /reverse colours, to choice. In graphics mode in V1.30, when you select 'monochrome', the vital elements still remain distinct no matter what colours you chose, and the corner decoration, if present, persists. So it's a tri-chrome.CHART SIZE: in graphical mode:
If you want your chart bigger, or smaller, the default size can be altered in Config.file, or in [Settings] > [Graphics Settings], and OK'ed.
For clearer charts, set your resolution higher if you can. Then, a vertical size of 701 makes a big chart if you have a 768 x 1024 screen.
For 800 x 600 resolved screens, a vertical size of 528 takes up the whole screen. (The dialog boxes are bigger at this resolution.)
When these dimensions are reset, you must save the Config. file, then re-launch, that will be your new default size.
NOTE: Chart dimensions are not a session tweak, and cannot be altered in-session, except by distorting it with pull-handles, or as outlined below.
A NEAT TRICK in V2.04, 2.05
With these releases you can 'shrink-graphical chart' on the spot, by repeatedly using the shift+Q keyboard switch - but be careful! - you can only resize it back up again with pull-handles (at the mid-sides of the window).
In doing this, press < key to make glyphs smaller: this allows shrinkage of all the graphics, too.
CORNER DECORATION SIZE:
When the coloured corners are switched on to 'moire', (change:YXC 0 80 60 to:YXC 1 80 60 , & Save Config.file), the moire must in fact be scaled down to:YXC 1 33 33 if on a standard-sized chart - which makes an appealing 'spider-web' surround as well.
FANCIER IMAGING: in graphical mode:
Depends on your imagination! - but Astrolog only supplies the images and text. After going [Edit] > [Copy chart as bitmap] in the graphical mode, then the chart, astrograph, dispositor page, map, aspect grid or any other chart can be pasted into MSPaint or other suitable image editor, for subtler colours or special arrangements for your gallery, or to print off.
With [File] > [Save chart as bitmap] (Ctrl+6), Astrolog by default will save a 24-bit bitmap - a very large filesize, and unnecessarily full of colour-writes, since Astrolog only uses 16 colours!. Opt for [Edit] > [Copy chart as Bitmap], but save it as a Astrolog uses a lot of fine lines, becoming apparently thinner as your chart gets bigger. The toggle, little 'i' (without the inverted commas) doubles the aspect lines to improve this, but can't be made default. [File] > [Save chart as wallpaper] (Ctrl+shift+I, J, or L), sets the bitmap of your current chart as your pc's desktop, replacing whatever you have.
PLAINER, INVERSE and PRINT IMAGING:

The keyboard switch 'x' inverts all colours, for each colour has an assigned opposite colour. See left, and right its inverse.
Clicking 'm' reduces the palette - only three colours, those you have defined as the default's 'white' and the default's 'blue' or 'black', plus any corner decoration, will be used. See below.
(In these images, light blue had already replaced default 'black' planets, and black had replaced the default (V1.30) 'dark blue' background, so - on inversion, 'my' blue planets swapped to red, as 'my' black swapped to white, and 'my' red corners became green.)
Monochrome, 'm', uses just three colours; two, if Corner Decoration is switched off.
[Extra] > [Bonus Mode] offers all the aspect lines thicker, - the shortcut is little i, which is a toggle. This improves the definition of aspect lines, but cannot be incorporated as default.
[Settings] > [Miscellaneous Settings] has fields where you can set the choice of 'landscape' or 'portrait' on paper, and define what paper-size you employ, when printing from the program.
Printing text, [Settings] > [Chart Settings], likeastrolog32.dat , hosts your choice for number of text-screen columns, - that number has to suit views onscreen (like [Lists] > [Interpretations]), and [Edit] > [Copy chart as text] outputs as well: with the latter, going Ctrl+1 will paste into a page without overruns (probably!).
What You see Is What You Get! - printing from the program, charts may reflect exactly what you have onscreen, except that if the chart is oblong through resolution issues, it may still print round (depends on the printer, too); so, making the chart smaller with the pull-handles, or oval, or without a sidebar - that's how it will appear.
TEXT-MODE PRESENTATION:
In text mode, pressing Alt+k will colour-enhance the lists. [View] > [Character Scale] offers you a way to re-size text - the switches 'Ctrl+1' for smaller, 'Ctrl+3' or 'Ctrl+4' for bigger, biggest, perform this alteration quicker - at best sizing, each line in lists will not over-run to the next line..
Chart data from the graphical option shift+V is a positions list; from the option Alt+shift+V, the House Wheel, it's a chart executed in a text form.
--------------------- --------------------
OTHER TEXT & GRAPHICAL TWEAKS:
Controls for these are not all gathered in one place, but [Settings] > [Graphics Settings] controls the chart-size (see above), globe-tilt, decorations at corners, and glyphs can be exchanged a for others which you prefer.
To expand the aspect-grid to embrace more 'objects', [Settings] > [Miscellaneous Settings] has that option.
[View] > [Character Scale] offers you a way to re-size the glyphs and planets, smaller or larger, to suit the chart-size you've chosen; this also re-scales text before output.
The switches 'Ctrl+1' for smaller, 'Ctrl+3' or 'Ctrl+4' for bigger, biggest, perform this alteration quicker.
These are changes you can make stay for keeps by saving the Config. file.
Text in astrolog32's graphics charts is bitmapped, which gives the program its clunky look. If you're seeking something more DTP in Astrolog's presentations, the chart panel can be created using Windows© Courier & Wingdings fonts, while there is also a freeware symbol-font for the charts, (Mr Hirst's font.. see www.bonniehill.net); these will enhance your charts. See [Miscellaneous Settings], or check out switches  GREECE, either in 1923, 15 Feb to 1 Mar/ in 1924, Mar 9 to Mar 23
Sweden, then reigning over Finland, started to change from the Julian calendar in 1700, but it was decided to make the (then 11-day) alteration gradually, excluding the leap days (29 February) from each of the eleven leap years, over 1700 to 1740 - the difference would not be constant, but change every 4 years.
But the leap days that should have been excluded from 1704 and 1708 were not excluded - they were still in fact 10 days behind. King Charles XII abandoned it - it was decided to revert to the Julian calendar. This was achieved by introducing the unique date 30 February in 1712, adjusting the discrepancy in the calendars from 10 back to 11 days. Sweden and Finland finally adopted in 1753.. Wednesday, 17 February, was followed by Thursday, 1 March.
.
Anyway, Astrolog automatically uses the Julian calendar for dates before October 4, 1582, and automatically uses the Gregorian calendar for dates after October 15, 1582, dropping the days the first adopters did. |
An online Julian-Gregorian converter S.Gibbs' site . For DST adjustments, click APPLYING SUMMERTIMES, 'DST'.
Roman, Muslim or Babylonian charts are an extra few pen-on-paper calculations away, unless you luckily know the Julian Day of the event: to get to the exact day in these calendars often involves counting the days from a month's start, which itself is defined by a moon-phase (livius.org, numachi.com and tyndalehouse.com have good information on their diverse counts - sometimes the whole year must be reckoned), but, with Astrolog32, you can find by inspection new moons after an equinox; and most ancient day-counts were reckoned from the sighting of such new moons. ~ But see below ...
If you use the Julian Calendar across or
So, Astrolog's-2 will give you a 3BC chart!
This may seem an insupportable nuisance, but ...
This remains an unfixable situation in Astrolog, but it also reflects a longstanding duality in historians' usual Pre-Christian chronologies. Since 1BC in the Julian Calendar is 0 AD/-0BC in Astrolog, to raise a chart dated "105BC" would require the input "-104". This adjustment must be remembered for charts throughout the five hundred fifty years BC in which epoch some good data are in fact available.
Remember to edit any graphic or text outputs, after saving and before printing, altering the year-data - because the chart WILL be right, but the year-number will be wrong!
Across Europe, choices of New Year's Day were shaped by states' regard for Papal Edicts advocating Jan. 1st, weighed against long-standing custom: Tuscany and The Venetian Empire were reluctant to adopt Jan. 1st, while Sweden was compliant by the 1530s. In France, it took the Edict of Rousillon (9 Aug.1564, OS) to promote it; the Florentines still held to tradition until 1749, when Granduca Francesco III di Lorena forced everyone to recognize the 1st of January only. Venice only capitulated in 1797!
This brought to an end a Italian local difference, too, in the year-count, because North Tuscany (Pisa) started their year of 1748 on (modern style) our Lady Day March 25th 1747, while South Tuscany (Florence, Lucca, Prato, Siena, and also some Papal documents) started their year of 1748 on (modern style) Lady Day March 25th 1748; while Venice started their years on Mar 1 from 1522 until 1797, (and so, their 1748 began on (modern style) March 1st 1748). Note: in Europe, the 'Dixneuvieme Siecle', 'XIX Secolo', refer to the years 1900 - 1999 and so before, whereas the 'Nineteenth Century' in English-speaking countries refers to 1800 - 1899 and so before.
See https://it.wikipedia.org/wiki/Stile_dell'Incarnazione
and https://it.wikipedia.org/wiki/Primo_giorno_dell'anno
I have learned to be most careful of calendaring and even hour-counting, when raising North Italian charts between 1300 and 1749: it varied pretty much to choice, and hour-counts often began at sunset.
Meanwhile, Byzantine Rite Orthodox countries used March 25th, same fashion as Pisa did (see above), but days behind, because they would not abandon the Julian Calendar until the 1910s and after.
And for Lazio & the Curia, the New Year began on Dec 25th (Nativity Style) until around 1800. This style of New Year pre-dates most other styles.
Britain & her dominions were also very late both in adopting the New Style (NS) calendaring and the year-starts on Jan 1st, clinging to March 25th, Lady Day, for the latter, on all legal documents; and so recorded dates from Oct 5th, 1582, to Sep 2nd 1752, across the British Empire (barring Scotland), may need to be corrected for use in Astrolog, on two counts: to add missing days from being behind the Gregorian calendar: but first, to locate any OS dates between Jan 1 and Mar 24 in the appropriate NS year! - and this latter catch applies, absolutely, before 1582 too, - See 'SWITCHING JULIAN TO GREGORIAN DAYS' image above.
However, during our Seventeenth Century, at least domestically, people began calling Jan 1st the 'New Year', e.g Pepys' diary 1667, - yet two decades later, Aubrey quoted his birth-year Old-Style, without remark, so basically, mid-1600s, it's your call! Find below Britain's old, then official, year-starts, by group. (all years are inclusive)
| Yrs c.1250 - 1582: all ran from March 25, OS |
| 1583 - 1599: All Britain years ran from March 25, OS (April 4, NS) |
| 1600 - 1699: Scotland years ran from Jan 1st, OS (Jan 11th, NS) |
&
| 1600 - 1699: England, Wales etc, officially, years ran from Mar 25th, OS (April 4, NS) |
| 1700 - 1752: Scotland years ran from Jan 1st, OS (Jan 12th, NS) |
&
| 1700 - 1752: England, Wales etc, ONLY officially, years ran from Mar 25th, OS (April 5, NS) |
| 1753 on: All Western Europe bar Venice ran from Jan 1st, NS |
Among chart-data which these considerations may affect are those of Boccherini, Corelli, Copernicus, van Dyck, Sir Thomas More, Jan van Goyen, Galileo Galilei, Michaelangelo, Isaac Newton, Queen Mary Tudor, King Richard 2nd, King Henry 2nd, King Henry VII, Queen Anne, Philip Melanchthon, Giovanni Tiepolo, ...
You can reckon to gain or lose two hours for each 30 degrees of 'easting' or 'westing', from your pc's time. So, if it's 9am in Cairo, and Beijing being 90 degrees east of Cairo, then it's 3pm in Beijing..3 x 2 hours ahead (each line on map marks two hours' rotation).
So, how to apply a timezone adjustment in the 'TimeZone' field, by entering additional or subtracted hours manually, - useful where the drop-down timezones are not available: bear in mind that your Astrolog32 is already set up to your local or preferred time-zone, and the shift you make is with reference to that timezone.
You must first:
- If you have DST 'on', and it won't apply in this case, take it off!
- Look up/reckon the time difference - in the WORLD TIME-OFFSETS TO UT, & DST daughter-page some timezone info sites are listed besides the timezone data you'll find there, and most of them give the time difference from UT; the chances are, some math will be involved to work out the correct number of hours for you to apply the difference in time as an 'easting' or 'westing'. Then type the number-of-hours shift in, if necessary with a minus before it, and Astrolog will make the adjustment. Only remember, Astrolog is quirky! - the following explains..
EASTING:to apply a gain ofWESTING:x hours from your home timezone, (i.e. for timezones ahead of yours,- that is, for places east of where your Astrolog32 is set), you enter like this: minus 1 hour (put-1:00 ) for places a single time zone away; minus 2 hours (-2:00 ), two zones away, and so on. From UT here in the UK, it's generally minus 3 (-3:00 ) for Baghdad, minus 10 hours (-10:00 ), for Australia NSW;
from Pacific Standard Time (PST) in USA, it's minus 3 (-3:00 ) for EST New York. This is for guidance only - these examples take no account of any local Daylight Saving adjustments.to apply a loss ofx hours to your local timezone, (i.e., for timezones which run behind your local time,- that is for places west of where your Astrolog32 is set), you will enter hours without the minus: e.g 3 hours (3:00 ) for California, if you're on Eastern Standard Time. So, from UT+1 in the Netherlands, apply 6 hours (6:00 ) to locate yourself in Eastern Standard Time US, or apply 9 hours (9:00 ) for Los Angeles, (that's a 1 hour westing to London Time, and 8 hours westing, London to L.A.). Again, this example takes no account of local Daylight Saving adjustments.
These entries state the REAL-WORLD offsets, before, at or behind Greenwich Mean Time (UT).
Astrolog users: be aware that the opposite sign, - / +, must be put in Astrolog's TimeZone box from these actual time-shifts in hours mentioned below, if you are not typing an actual shift-code! |
| 0.00 _open to manual input ~ put +/- number |
CET =Central European Time *, European Union, Maghreb, Switz. UT+1 |
| of hours/mins from your default zone |
EET =Eastern European Time *, Ukraine, Turkey, Bulgaria, E.Baltic UT+2 |
| HST =OLD Hawaii Std. Time:. will apply UT-10:30 | UZ3 =only now, Moscow to Azerbaijan, UT+4 |
| CAT =Central Alaska Time * UT-10, now use for Hawaii |
UZ4 =pre-2012 Yekaterinberg; now N.Caspian to Pakistan, UT+5 |
| AHS =Alaska Standard Time *;(not Hawaii now) UT-9 |
UZ5 =Omsk, pre 2012; BanglaDesh, & now 2012 Yekaterinberg, UT+6 |
| YST =Yukon Standard Time * UT-9 | IST =India Time UT+5.30 |
| PST =Pacific Standard Time US * UT-8 |
NST =N Sumatra Time - old, now Burma, UT+6.30 |
| MST =Mountain Standard Time US * UT-7 |
SST =OLD S Sumatra Time, Vietnam, Siam, Laos, N Malaya UT+7 |
| CET =Central Std. Time US *, & Mexico* to C.Rica UT-6 |
CCT =China Time, ASEAN Time, Yakutsk, Perth Aus.!, UT+8 |
| EST =Eastern Std Time US *, Ecuador,Columbia UT-5 | JST =Japan Standard Time, Korea, Irkutsk, UT+9 |
| AST =Atlantic Std Time US*. Chile!, Parag.!, W.Brazil, Bolivia, UT-4 |
SAS ='South Australia' Time (Adelaide) !, UT+9.30 |
| BST =Mecca Time; Riyadh, Addis, Baghdad UT+3 |
GST =Guam Standard Time UT+10, Queensland, NSW ! |
| WAT =West Africa Time-same as UT |
UZ1 =Kamchatka Zone, pre-2012 - now not significant, UT+11 |
| GMT =Greenwich Meantime UK * - same as UT |
NST =New Zealand Time, old, UT+11.30-not since 1941 |
| WET =Western European Time * -same as UT |
LMT =Local Mean Time - see (LMT) note below |
| ADT _UT-3, Atlantic Day Time - Argentina, coastal Brazil, Uruguay ! | EWT _UT-4, Chile*, Paraguay*, W.Brazil, Bolivia !; southern West Indies Isles |
| IDL _UT+12, now Tuvalu, Fiji, Marshall Isles, West Samoa, Kiribati | AHS _UT-10, for Alaska *, west of 141 deg. W., pre-consolidation in 1983 |
Timezones in this list cannot be set as default, simply as a result of setting in 'Enter Chart data', and then saving the Config.file: see how it's done here.Local Mean Time (LMT) Note: the special time zone setting "LMT " allows you to do charts at times given in Local Mean Time, a time-reckoning used where the Sun is the only clock, where time-zones are ignored, or before they were invented. This is the one code that you can't set as a default in [Edit] > [Set default location, time-zone..] menu.
When the codeLMT is selected, a local time will be reckoned for that exact longitude, doing the "subtract four minutes for every degree west of your time zone's standard meridian" arithmetic, to make it work for that specific longitude's local-time. This is handy for countries where time is a local matter still, or Western dates pre-1850, when towns had their own local times.
You can create a rough chart for an unfamiliar place usingLMT , without ever troubling with time-zone input!
You will see that after the chart is made, the difference betweenLMT and your default timezone is shown in the TimeZone box. Unlike any other timezone input,LMT refers to a particular location: it does not refresh itself, so has to be reset at the next chart you make (re-select, or type, 'LMT '), unless the location remains exactly the same.
NOTE: Astrolog32 does not make any automatic DST adjustments, - they must be made manually. See WORLD TIME-OFFSETS TO UT, & DST for relevant data.
The DST option will be set for your next chart, or the whole of your session, by selecting 'Yes' in the 'Summer Time' field visible in [Edit] > [Enter, edit mainchart data] dialog, and this will insert a one-hour docking for when hours are shifted ahead in summer; useful as the Zones drop-down doesn't include any summer-times.. the next time you launch Astrolog32, it will have gone.
To make Astrolog dock one hour by default as standard, during the months your clocks are advanced ~ go to [Settings] > [Set default location, timezone..], and change the top field, (the same place to take it off again). Go [Edit] > [Edit configuration file], save, and re-launch; then make an 'Here & Now' chart. The 'DST' field will register [YES], but you can turn it off for non-DST charts, for the rest of the session.
COMMAND SWITCHES: WHAT THEY DO:
Command-line input remains the most potent and fast interface to Astrolog32 (though a very few switches may have lost or changed functionality in successive incarnations of Astrolog).
Essential if you want to quickly flip to a setup which only a command switch accesses, or is a bother by other routes...
To use them, you must call the command-line box (go [Run] > [Open Command Line]):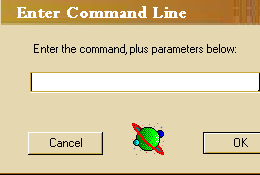
What it's asking: "Enter the commands (i.e. switches), and (any required) parameter(s), in the field below"
Try typing-c 2 and 'OK'ing it, - Astrolog32 will bump the chart into Equal House; however, note that many, many useful options which the command-switches can access will not appear unless you are in text-mode, so select that beforehand or after, by typing letter v.
To revert the change, you need to know that switch too (..and here's my difficulty with explaining switches - I don't know your starting-point; was it Placidian? Koch? Other? - you could close the program and re-launch, to revert, ) but anyway, try-c 0 reverts to Placidian,-c 1 , to Koch.NOTE:
typing -c does the same as typing /c
.. / and -, either, as suits you
The command-line is opened more simply by pressing [Return] key! - once, to open the Command-Line; then type in the switch(es), then hit Return again (to make it happen).
This swift altering of the program is possible because every object, every aspect, each colour, and every House System has a reference number, referred to in the Helpfile as an <aspect>, an <objnum>, a <color>, or <value>; you will find some of the objects' numbers here, colours' numbers here, and House Systems' numbers here. A Fuller listing is at the end of the LIST of COMMANDS page
The source for all the command-switches, detailing what each does, was for a long time just the 'Switches' page in [Help], andHelpfile.TXT bundled with the program; but these lacked much searchability .. now either HELPFILE.HTML or LIST of COMMANDS is available to browse.
Remember, many results are displayed only in text-mode.
Getting back to your point of starting, try shift+V; it is best practice to clear each switch or macro back to the core data; shift+V clears some; other commands need 'kill' switches to revert them, namely:A 'kill' switch is my term for a switch written specifically to revert another.
- Switches which affect how the chart parameters are obtained.
- Switches which affect how a chart is computed.
- harmonic switches.
EXAMPLE
To hide aspect-lines, put in-YAR 1 5 1 1 1 1 1 -YAR 6 11 1 1 1 1 1 1
'kill' to recall aspect-lines
put in-YAR 1 5 0 0 0 0 0 -YAR 6 11 0 0 0 0 0 0
EXAMPLE
To invert colours, and Switch off decoration, put in-Xr -YXC 0 32 32
'kill' to revert colours, set deco to web, '64'
put in-Xr _YXC 2 64 64
ELABORATE EXAMPLE
to see the shape of meetings and friendship over the next 52 weeks...
Assuming you have your birthchart in your\charts folder, "mychart.dat ": (replace "mychart" with the name yours goes by)..
put in-R 2 5 7 8 9 10 11 16 17 19 20 21 -r0 mychart.dat nul ;
~ (I'm guessing you have nodes (16,17), Chiron (11), East Point (21), Vertex (20) ON: if they're OFF, they'll toggle ON..) ~
press Enter key ~ and now, at keyboard, type Alt+c, i, $, 7, p... and p again, to stop.
'kill' to revert to 'as you were'-YR 0 10 0 0 0 0 0 0 0 0 0 0 0 -n ;
..now, at keyboard, type c, i
Writing 'kill' switches as well is a chore, but V2.04 and later releases have the answer! - see the invoked Macros Resetter BACKtoMAIN, here.
Peek here at my SWITCHES list; or dig in to the mine of info that is
Sometimes, as in horary or mundane charting, it's valuable to rotate the chart away from native' or 'querent' to left, so as to get another's perspective: or, to put it another way, re-number the Houses: this is a defined option, using the-X1 and-X2 switches (which make great macros - see F.A.Q.s here):
-X1 places the following cusps to left, if their object-number follows the-X1 after a letter-space:22 for Ascendant,23 2nd Cusp,24 3rd Cusp,25 I.C.,26 5th Cusp,27 6th Cusp28 for Descendant,29 8th Cusp,30 9th Cusp,31 M.C.,32 11th Cusp,33 12th Cusp.-X2 places the above cusps to top, if their object-number follow the-X2 after a letter-space.
A TASTER OF SIMPLER SWITCHES
SWITCH FUNCTION EXAMPLES TO TRY TO REVERT.. -a textlist of aspects -a -ga -g ; app/sep aspects -v -i display chart x.dat -i mychart.dat no revert with V1.3x -r compute ... -r3 ; for triwheel -r1 -d show text-list of aspects..dy,month,yr -d 1 or -dm 5 or -dy 2020 -v 0X1 FORCE TEXT-ONLY - - no revert -X1 Put Obj to Ascendant -X1 sun -X1 ASC -g text aspect-grid -g -YR 11 21 1 1 1 1 1 1 1 1 1 1 1 -v -YR 11 21 1 1 1 1 1 0 1 1 0 0 0
Introducingnul andtty ..not switches, but two 'placeholder' parameters to insert where some <file x > is normally specified., when using-i &-r commands.nul tells Astrolog, 'just use the data currently on this chart thread..'tty tells Astrolog, 'prompt the user for the info..'
Macros which are chains of command-switches remembered by your program and usually pre-prepared by you (and pondered, before adoption!), by-pass the command-line. Jump to MACROSGlobal Shortcut COPY HIGHLIGHTED TEXT Hold down Control ~ Hit c |
Global Shortcut PASTE COPIED TEXT Hold down Control ~ Hit v |
THESE TWO OLD-SCHOOL SWITCHES ARE VITAL, THEY SAVE TYPING:
The first copies switch-snippets from anywhere, and the other inputs the snippet quickly into any field or text...
but I find lots of pc-users have never used them!
Ctrl+c copies from dialog-boxes, HTML pages, file lists, text-files, file-names & More!
And Ctrl+v pastes into command-line, 'name' field, 'path' fields, as well as docs!
They are essential! ..see animation here, to illustrate
- - - - - - - - - - - - - -
Switches (and macros) can be used one after another, if they don't countermand each other. You can use switches or invoke macros, wherever you install the program... You can use a semi-colon, ;, after your command, to stop Astrolog32 reading any further: this allows you to add a comment, like Find a list of the switches by opening the page LIST of COMMANDS. It's not exhaustive; there are also other switches which you may find in the Helpfile. Also, in the Config.file Remember, Command Switches are case-sensitive! Between two (or more) successive switches, (each complete with the parameters that may follow them), just include a space between the first and second: but any parameters required by the first need to be sufficient..: this is why Astrolog32 often displays 'Too few parameters to Switch' error notices - it considers the parameters you gave for a switch inadequate! (..and won't proceed to any second or third switch.)..JUST ABOUT SWITCH PARAMETERS: or, WHAT THESE BRACKETS, DOTS etc IN THE COMMAND-SWITCH LIST SIGNIFY in the LIST of COMMANDS..
don't type them in!
EXAMPLE
..here's a switch which, in its bracketed bits, has a guide as to its due parameters:/t <month> <year>: (Compute all transits to the Radix, in month/yr.)
Here's what you might put:/t 2 1956 Parameters give 'specific things' for a switch to operate, a group of objects, or years, or charts, and the kind of 'thing' is always indicated between some brackets, - you can see them in the [Help] > [Switches] page, or LIST of COMMANDS page, or the Helpfile, -but you don't put the brackets, commas, ellipses in!
Another example: the available parameters for the-Xs switch are-Xs <100,200,300,400> , - meaning the-Xs switch can be followed by any one, (but only one), of those possible options, as:-Xs 100 ,-Xs 200 ,-Xs 300 , or-Xs 400 - no tags, no commas.
SO NONE OF THESE MARK-UPS GET TYPED INTO A SWITCH:
< and >,(tag brackets), are commonly used to wrap & indicate a command switch parameter which you should replace by the appropriate value.. (The Helpfile's 'Description of Each Switch' will tell you the kind of value..)[ and ](square brackets), are used to wrap & indicate an extra command switch parameter which is optional....,
(an 'ellipsis'), within some brackets, generally refers to a variable length list of values, - up to you what you include, so see helpfile for relevant info.., , ,(commas), are used to separate either/or parameters: choose one, or another; so commas don't get typed in!
Just take note of any letter-spaces between parts of a command - this is an easy error. .. or if you have this as V.2.04+ macro, it's linked to in either
MACROS: WHAT THEY DO:
Macros are just frequently-used switches (often chains of them, so they change lots of things all at once); too long to type, you could just store frequently-used switches in any handy document-page open at the same time as Astrolog32, then 'highlight', copy & paste them into the command-line; but there's a more elegant way.. call them from Astrolog32, with one touch of an 'F'-key. (About switches, see above).
After you have assigned uses to the function keys ", , .." through to ", ", (and subsequently there's Shift+function-key, then Alt+function-key.., and so on to call up higher numbers - but in V1.3x, they fail generally beyond M0 48), you will have created 48 'Fx' macros - there's always the Menubar way of running them, too - see an image of the v1.3x [Run] drop-down here, showing the [Run] macro-menu: it shows each macro in its dropdown of links & fly-outs. (From the keyboard, 'Enter' will open the command-line, but not the [Run] menu).
With V2.04+, clicking [Run], the 'Portal' link [Open Command File] is a new option: it offers two new configuration files, - eitherMACRO_default.dat orMACRO_personal.dat - either one, when double-clicked, will activate the new-style caches of (potentially) 120 pre-written macros, each of which you can try out, or modify to your own purposes.
A macro can load a chart the moment you launch Astrolog32: using an V1.30 macro (for an instance), the F2 key would call a birth-chart for 'John Bull', where you have a finalastrolog32.dat entry like this:-M0 2 "/qb 6 1 1900 12:00:00 ST +0:00 1:37:00W 52:26:00N" ;
-WM 2 "John Bull" ;

In this 'new cache of macros', macros using the F-keys mostly have pre-written functions, in anticipation of your preferences, and are run-ready, though this macro-module is a work in progress.. Many of these macros run from.dat files in\MACRO , which you can edit in Notepad, and all macros become available if the cache is invoked as follows..
So long as you are in Advanced Mode, then when you have clicked [Run] > [Open Command File..] and double-clicked eitherMACRO_default.dat orMACRO_personal.dat link, the [Run] drop-down will 'go live', - either choice creating the self-same (and editable) drop-down of macro-links, but delivered through two different portal files,MACRO_default.dat andMACRO_personal.dat .
Clicking any of these macros onscreen, or with an 'F' key, executes a switch-line, summoning up tweaks to the data served, or to configurations, appropriate to the chart in question and by-passing yourastrolog32.dat defaults, as the portal files make datfiles in the MACRO folders run.
MACRO_default.dat andMACRO_personal.dat These two files are the Portals to access the 'live' Macro Menu:MACRO_personal.dat until you have personalised a file that it calls,personal.dat ! If you treasure your usualastrolog32.dat settings, try outMACRO_default.dat .
At first, with both, if you press Shift+F8 'RESET', they reset orbs-of-aspect very tight!BACKtoMAIN.dat This is arguably the most important macro in the 'live' drop-down..As each macro must be cleared before another is run, the most used and important macro here is at shift+F7,BACKtoMAIN.dat : it will clear ANY macro, ready for a next one,.. (There are also three macros to turn off interpretations and combination charts, not yet written!). Shift+V still also works as normal.
ALSO NOTE shift+F8, --------------------- --------------------
CURRENTLY, with New Macros activated
, , - call charts to suit couples in a partnership - over-write ad lib.. The third, (3.dat in../CARTE ) is a_pos.dat composite of1.dat; 2.dat
is unallocated - you can create a macro at F4 immediately!
& call older / modern dignities, throughTRADIZIONALI.dat, MODERNE.dat
- restrict to our modern planets, only ancient, or only Luminaries.
calls asteroids, through the filter ofPIANASTE.dat
- shift+F5, switch orbs for different situations.
, shift+F6 is unallocated - you can create a macro immediately!
, shift+F7 - abandon last macro, ('BACKTOMAIN').
, shift+F8 revert program to Config.file's and 'New Macros' defaults, ('RESET')
- , shift+F9 to shift+F12, unallocated at present
- , Ctrl+F1 to Alt+F1, call transit dialogs for each planet
- , Alt+F2 to Alt+F9, unallocated at present
- , Alt+F10 to Alt+F12, and beyond, are some Planets' Returns...from this point, functions are indicated, but only some are defined, and they only work with a mouse-click ~ many potential macros are sacrificed to make explanations, e.g. macro 61.
 at your elbow! Put simply:
MACRO_default.dat ,MACRO_personal.dat , which make the [Run] Menu, live in..\miscellaneous , and present the 'new macros'...
default.dat andpersonal.dat live in..\miscellaneous\MACRO\PERSONALE BACKTOMAIN.dat , and the twoRESET.dat s, live in..\miscellaneous\MACRO\DEFAULT 1.dat, 2.dat and3.dat , (F1, F2 & F3), are in..\miscellaneous\MACRO\CARTE : overwrite1.dat, 2.dat with your own choices of charts.
THE RESOURCE FOLDERS HAVE ITALIAN NAMES..
PLANETS - various selections, DIGNITIES - as different options, ORBS - for varied situations,
PROGRESSIONS - for various periods per planet, TRANSITS ditto, INTERPRETATIONS; ..ALL INmiscellaneous\MACRO . ..of special note, macro 64, automatic 'Secondary Progressions', in PROGRESSIONI, conveys objects to today, by 'one day's travel for each year' or part thereof pro-rata.
PATH
To view all these files and macros, click 'My Computer', click Local Disk 'C:', clickastrolog , clickastrolog32 , clickmiscellaneous ... and you're there.---------------------
CUSTOMIZING, EXAMPLES:astrolog32.dat , and can indeed be simply typed in there. Useastrolog32.dat macros as a sandbox! - bound to add, backastrolog32.dat up first! - and only save the file with Ctrl+s, (why?) .. - see how old-style macros work here).To edit these pre-defined New Macros, a very thorough grounding in Astrolog32 switches and Windows' address-paths is useful to avoid messing up - open either Portal file,MACRO_default.dat orMACRO_personal.dat in Notepad, (or better, an editor like 'Gedit' with coloured markup BibTex or CG, because New Macros are unforgiving of error - you may see the standard error message "Value 0 passed out of range" on running the Portal file). * * BACK UP FILE, FIRST * *
NOTE: After each edit, you can keep the program running, and refresh your 'MACRO_personal' drop-down, by flipping to [Run] > [MACRO_default] then back again to see your newly-written macros listed.. and try them out! Also, the same trick editingMACRO_default.dat ! (Better you edit just the one first, as the other will serve as a backup version).
Rather than writing your own, you can insert specimen 1 - 18 macros by highlighting and copying off this page; ~ as pic, right
Ultimately you can adapt allMACRO_personal.dat to offer a custom list of macros and settings, like, or different toMACRO_default.dat and to yourastrolog32.dat , while still retaining these two unaltered. And you can alterpersonal.dat , the config.file whichMACRO_personal.dat runs - me, I just hacked my old, customisedastrolog32.dat data into place withinpersonal.DAT , as I couldn't stand the multicolours, and wanted my preferred orbs; and, liking a black background, I removed the line-Xr ;inverted colours . (See STANDARDISING PERSONAL.DAT AND ASTROLOG32.DAT ).
Finally, if you prefer your new settings via ..[Open Command File] > [MACRO_personal], renameMACRO_personal.dat asautorun.dat and ever after, when you open Astrolog32, all the V2.05 macros will be available without clicking anything.--------------------- --------------------
You can chop & change macros' positions, in the list, to bring your favourites to the lowF numbers. Here is a simple edit toMACRO_default.dat , to makeF4 (unallocated) set the chart to Harmonic 4 (with Null Houses):EXAMPLE
1. OpenMACRO_default.dat in Notepad, to get to alter the-WM 4 name-line, and add a-M0 4 instruction-line,-WM 4 "-> Set harmonic 4 & Null"
-M0 4 "-i C:\Astrolog\Astrolog32\miscellaneous\MACRO\ARMONICI\h4.dat"
Save file.
2. Now go to folder ..miscellaneous\MACRO\ and make a new folder 'ARMONICI ';
in it, create a new empty text file, renaming ith4.dat
Open it and type in just the following:@0309
-x 4 -c 14;
; set to harmonic four
And save file.
Test, by calling [Run] > [Open Command File..], clickMACRO_default.dat , press F4 key...
'kill' to return to harmonic 1:
press shift+F7, to runBACKtoMAIN.dat .
The names in the drop-down menu of [Run] will update after you re-name them & save, depending on whichever 'Portal' file you edit.
For New Macros to work from 'F' keys now, the program must, so we are told, be installed at the root Macros written to Running switches without F-keys, you can revert some using shift+V or a 'kill' macro, - but try running either of the Command files, then pressing shift+F7, to run Looking through what New Macros default choices at F1 through F12 currently set, there's a lot as a modernist I'd change, because I'm very happy with Astrolog32's dignity choices, and feel Traditional methods chase the wrong hare - so for fellow-modernists, here's some 'New Macros' suggestions, F4 to F8, F10 & F11, forMACRO_personal.dat (orMACRO_default.dat substituting RESETDEF at F8), which may better suit Tropical users wanting single-key presses:
MACRO No. (Revert)
/M0 number (& switch in inverted commas)
/WM number (& name in inverted commas)
F4 (Use Reset)
/M0 4 "-Yk 0 8 9 4 3 15 11 11 11 11 11";
/WM 4 "Mystery Blue Background"
F5 (Use Reset)
/M0 5 "-YAR 1 5 0 0 0 0 0 -YAR 6 11 1 1 0 0 1 1";
/WM 5 "Seven Major Aspects"
F6 (Use Reset) /M0 6 "-c 12"; /WM 6 "Whole Houses"
F7 (Use Reset) /M0 7 "-I 80"; /WM 7 "Call Interpretations"
F8
/M0 8 "-i C:\astrolog\astrolog32\miscellaneous\MACRO\DEFAULT\RESETPER.dat";
/WM 8 "RESET"
F10 (Use Reset)
/M0 10 "-gp";
/WM 10 "Set Aspects to Parallel"
F11 (Use Reset)
/M0 11 "-YR 11 21 1 1 1 1 1 1 1 1 1 1 1";
/WM 11 "Restrict Points from view"
All of this has a point if, ultimately, you feel able to renameMACRO_personal.dat asautorun.dat .
--------------------- --------------------
STANDARDISINGASTROLOG32.DAT andPERSONAL.DAT : .. MAKING THE LEAP
Let's assume you like yourastrolog32.dat configuration as it is; it's in\main .. you want the same config. with 'personal' ..
The V2.0x 'personal macros' configuration file,personal.dat is in:
C:\astrolog\astrolog32\miscellaneous\MACRO\PERSONALE\ Openastrolog32.dat file in Notepad, (Gedit, Vim..)
Highlight everything from:
_s ; Zodiac selection ["_s" is tropical, "=s" is sidereal] .. ..yours may be different where italics
down to:
:YXC 1 33 33 ; Corner Decoration <0 = none, 1 = moire, 2 = web> ..yours may be different where italics
go [Edit] > [Copy];
C:\astrolog\astrolog32\miscellaneous\MACRO\PERSONALE .. and openpersonal.dat
Highlight everything from:Go Ctrl+s, to save
_s ; Zodiac selection ["_s" is tropical, "=s" is sidereal]
down to:
:YXC 0 66 66 ; Corner Decoration <0 = none, 1 = moire, 2 = web>
go [Edit] > [Paste];
personal.dat . Closeastrolog32.dat .
Job done.---------------------
V1.30_Standard
In all versions before V2.04, no
macros were defined - so, up to you!
To set what any macro is to be, we used to just use the command-line itself, using these two special switches:1. ..Go [Run] > [Open Command Line] 2. ..type in special switch -M0 , then a space, then the number of the macro that you want to use, another space, then the command-switch or string of switches you have in mind IN QUOTES, like this:-M0 7 "/somestring /some other string" . press Return key, to send the macro to RAM...
...Up till this point, pressing the 'F7' key, you will get the warning "Macro number seven is not defined".
3. To finish, now define the macro's name (the name that will appear in the menu to designate it), using this special switch:
.type in-WM , then a space, then the same number of the macro that you want to use i.e.7 , another space, then your title IN QUOTES, like this-WM 7 "Sets something & something else..." , - press Return key.
NOTE: Once defined, macros would be found, hopefully, written at the bottom of yourastrolog32.dat - they may be available after a re-launch, or re-save.THIS PITFALL OF THIS METHOD IS [SAVE CURRENT SETTINGS]
MUCH SAFER: If you prefer, simply type your macros intoastrolog32.dat , then save the file with Ctrl+s.
NOTE: saving with [File] > [Save current settings] wipes all the old-style macros out; the nuclear option
to avoid this is to makeastrolog32.dat read-only, which is my choice, but will only suit if you'll never changeastrolog32.dat again.

As with the all versions, some macros can be set off successively, but generally, macros should be reverted before another is used, and the keyboard switch shift+V does this for many things, but not House systems, harmonic commands, 'Switches which affect how the chart parameters are obtained', nor 'Switches which affect how a chart is computed':...for these awkward macros, you can and should make a 'kill' macro that reverses the change.
e.g. for reverting harmonic charts to Radical, make an unused macro just set switchx 1 , and name it 'Radical', in the manner described above.
NOTE: that
A few sample macros to try, in any version of astrolog:
1.
Person's chart saved as macro 11:
after theDII line, type:
/M0 11 "/qb 4 21 1926 2:40:00 DT +0:00 0:10:00W 51:30:00N" ;
Press Enter key. Type...
/WM 11 "Queen Elizabeth" ;
Save Config file with Ctrl+s.
'kill' to return to 'Here & Now'
Open Command Line, type-n ; Press Enter key.
2.
Major Aspects only (i.e. Ptolemaic), as macro 4:
after theDII line (and any previous macro), type:
/M0 4 "-YAR 1 5 0 0 0 0 1 -YAR 6 11 1 1 1 1 1 1" ;
Press Enter key. Type.../WM 4 "Major aspects" ;
Save Config file with Ctrl+s.
'kill' to return to Astrolog32 Defaults, as macro 5:
after theDII line (and any previous macro), type:/M0 5 "-YAR 1 5 0 0 0 0 0 -YAR 6 11 0 0 0 0 1 1" ;
Press Enter key. Type../WM 5 "Default aspects" ;
Press Enter key. Save Config file with Ctrl+s.
The last-line entry in
Rather than writing yourown, you can insert 1 - 12 macros on this page; ~ see pic, right, for where.
my own experience of switches has been brief, preferring astrology over geeky, butWith switches:
HARMONIC SWITCHES:
These are accessible quickly in both text and graphics mode, via the command line in [Run]; typing 'x 2 ' in the box (without the hyphens), will raise the second harmonic when you click 'OK'. For the third harmonic, it's 'x 3 ' and so on. Note the space between the x and the figure. The chart's orientation remains as the Radical chart, (although you could choose 'Null' Houses, Ctrl+shift+N, or do other tricks).
Default on a re-launch remains Harmonic 1, but if, during one session, you have set the Harmonic at a particular value in a chart - all subsequent charts you move on to will be shown at the same harmonic (even charts #2, #3 and #4), until you go back to harmonic 1 via the command line, or via the [Settings] > [Calculation Settings] dialog.
In the Command-line, type 'x 1 ' (without the quote marks), and click 'OK' to return to the First Harmonic, i.e the Radical._pos.dat ; - otherwise, only an image or text file will serve to capture the chart.
What will be saved, when you go [File] > [Save Mainchart data], is a timed.dat file at Harmonic 1.
Config.file is a short text-file. At every launch Astrolog32 reads this file once, and does what it says, presentationally. CalledEXPLAINING LINES & FLAGS OF THE CONFIG.FILEastrolog32.dat , it is most easily viewed while the program is open (keyboard switch is Ctrl+shift+0 (zero)), or by going [Edit] > [Edit Configuration File].
Or without opening Astrolog32, if you navigate to the\astrolog32 folder and open it, then open the\main folder: locate the file, then Notepad can open it - ('though Windows© may tell you it can't: go 'pick program from a list > Notepad').
Excerpts from each part of a not-untypicalastrolog32.dat are explained in detail below.
The Config. File is editable (which is what this section is about); it is also swappable: to see this, remove your currentastrolog32.dat from\main to somewhere SAFE, and then open and save the following file, different.DAT, back to\main , asastrolog32.dat . Then run Astrolog32 - green and yellow, right? - Quick, swap back in the original! or maybe not! ~
The file's working sections set:
1. your time and place. 2. display formats, and kind of astrology defaults. 3. various choices of objects and orbs. 4. which objects are shut off.
5. which are shut off in transit. 6. which are shut off in progression. 7. aspects on or off. 8. size of orbs. 9. limit of accumulated orbs.
10. 'influence' values. 11. 'influence' values in transit. 12. chart colours. 13. text or graphics. 14. the paths to its folders. (15. any macros).
Each line controls a separate topic, and changes need to be done with full attention not to disrupt the order of 'flags' and spaces.
The lines start with a line-flag, (which you may be able to alter to 'off', or to 'on' - see on..). Sometimes the next bit is a 'range parameter' (not to be altered) - about, see WORD LOOK-UP.
Then a string of numbers or zeroes follow, called 'flags'. A semi-colon marks the end of the working code, and the start of a comment about it.
The changes you make need to be saved, in order for them to become the new defaults. After saving, your alterations will appear at the next session.----------------- ---------------
From the section DEFAULT RESTRICTIONS; here is line 2 (and yellow dots mark the spaces between flags):
What this line declares is:
first, the codeYR that says it's an Overall Restriction / Allowing-of-Objects switch-line: it has the line 'switched on'; (to switch it off, you can put=YR , at the front, instead of-YR ).
there's a space, then, second, there's a range-parameter11 21 , (MINORS & POINTS), and tells Astrolog32 it is the minor planets & points to be switched in this set, for calculation and showing.
Last, and after TWO spaces, the place in the string of0 s &1 s that follow, defines which minor planet or calculated point you are switching into use, or off: minor planets & points are always in this order:
~ here those flagged with a '0 ' are 'ON', (namely Chiron, N.Node, S.Node, Pars, Vertex, East Point),
while '1 ' at a position signifies OFF.
For this line, zero (on), or one (off), are the only options for the positions in the flag-parameters' string in this line.
You should not touch the range-parameters.Often, an initial underscore (_) toggles the line's status from (=) , and an 'oh' (o) toggles the line's status from (-) ; ..these are Astrolog's most common 'flags' for signalling on/off of a particular entire entry-line.
ALSO, Where there is a range parameter after the letter-code, then (except in DEFAULT GRAPHICS & one or two other sections), there are usually 2 LETTER-SPACES between the 'range parameter' and the string of 'flag-parameter' numbers.
At any stage in the evolution of your own distinctiveastrolog32.dat file, in fact, you can save backups from the Notepad window it's in by opening [File] > [Save As ..] (say for instance.. astrolog32_beforeIalteredit.dat), and save it where you like, then close the window.
~ BACKING UP FIRST...
As the program relies expressly on this file's instructions and where you've no backup of your chosen set-up in your system, safety suggests, before doing anything to it, to make a backup ofastrolog32.dat in its present stateby A:- going [Edit] > [Edit configuration file], and in the Notepad window, going [File] > [Save as ..](for instance)astrolog32.old ; then, doing the edits you want, and re-saving asastrolog32.dat
Or better, B:- via Explorer window by copy/pasting a copy ofastrolog32.dat from the\main folder, into the\miscellaneous folder (and you could rename it), before going ahead and making changes.You can then proceed with confidence.
(TO ROLL BACK to the BACKUP VERSION: open the folder where the backup was stored, find your backup file, (change your chosen backup file's suffix to ....dat, if that's missing), then open it in Notepad, not in order to alter it but just so as to re-save it under the title that Astrolog looks for,astrolog32.dat , saving back in\main folder. You may be asked "Do you want to overwrite?" - go "OK".)
If I haven't decoded the particular line that you are interested in, please scroll up or down other sections, to find entries doing something similar, and use them to decipher the appropriate string, and reckon what kind of changes to the string you can best make.
Otherwise, read theHELPFILE.TXT , using Ctrl+F and searching for the letter codes that begin most lines inastrolog32.dat .
Open your ownastrolog32.dat , and compare with this annotated version - though yourastrolog32.dat WILL be different, reflecting either the defaults, or your past choices:
| @0307 ; Astrolog32 Version: 1.30 ; File Name: astrolog32.dat ; NOTE: Everything from a semicolon (;) until the end of the same line ; is considered a comment, and is disregarded by the program.
BASIC SWITCHES
~ four examples, from the many entry-lines:
line 1: "Daylight Saving" here it's on DST [After the space that follows the -z0 code, 0 is standard, 1 is DST - hour added]. For old-schoolers, this would be re-typed twice a year, manually.line 2: "Default Time Zone" Default time zone shown here is minus2 (2:00 hours before Universal Time, which gives East European Time, as a correction to GMT/UT.)line 8: "House system" where: 0 = Placidus, 1 = Koch, 2 = Equal Houses, 3 = Campanus,line 16: "Calendar formats" where =Yd sets to day/month/year, _Yd sets to month/day/year (U.S. style, as here). SWITCHES NOT SUPPORTED BY ORIGINAL ASTROLOG ~ one example, from many entry-lines: line 10: "Aspects Display -detail" in the Sidebar, to either show aspects as 1, or 2: YOUR DEFAULT RESTRICTIONS FROM CALCULATION & VIEW ~ one example, from four entry-lines: line 1: "Major Planets" In the last string of eleven numbers, the flag-parameter '1' switches each planet in a sequence OFF from all calculation, while '0' is ON. YOUR DEFAULT TRANSIT-RESTRICTIONS ~ one example, from four entry-lines: line 4: "Uranians" Only in transit charts, this line controls whether Uranians are calculated and shown. YOUR DEFAULT PROGRESSION-RESTRICTIONS (FOR DUAL CHARTS ONLY) ~ one example, from the entry-lines: line 2: "Minor Planets, & chart points" Restrictions/derestrictions here means you can switch 'off' things you don't want, or 'on' things you do want: in this case Minors & Points, within dual charts.. the flag-parameter '1' switches each item OFF from all calculation, while '0' is ON. YOUR DEFAULT ASPECT-RESTRICTIONS ~ one example, from three entry-lines: line 3: "Obscure Aspects" Restrictions /derestrictions of aspects you do or don't want. (For the sequence of the Minor and Major Aspects entry-lines, they are the same as you can find in the example further down ~ the " -YjA group" in "YOUR DEFAULT INFLUENCES of OBJECTS".) YOUR DEFAULT ASPECT ORBS ~ one example, from four entry-lines: line 1: "Major aspect -orbs" Here after the range-parameter 1 5 , the five flags, each inserted to one decimal point, - and each number separated by a space, - are my current default orbs for each of the Major aspects, in this order: Conjunction, Opposition, Square, Trine, Sextile, in that order after the Major Aspects-Definer-YAo 1 5 . YOUR DEFAULT PLANETARY-ASPECT ORBS ~ one example, from the entry-lines: line 2: "Minor Planets, & chart points" After the range-parameter 11 21 , the string of flags, divided by single spaces, here indicate the Minors, (see above for their order), and each can be set at any value from 0 to 360.The first entry-line sets max. planet orbs for the Majors - for order, see sections above. The third entry-line is House cusps, and the fourth is Uranians, - all exactly in the orders as they are presented in [Settings] > [Object Selections] menu. YOUR DEFAULT ASPECT ORB-ADDITIONS ~ one example, from three entry-lines: line 1: "Major Planets" On this line as it is here, a customary addition of 2.0 degrees or more can be routinely added to the orbs of Sun and Moon, (they being the first two of the 'first to tenth' string which follows on after the Majors range definer 1 10 and the double space). YOUR DEFAULT INFLUENCES of OBJECTS ~ four examples,.. one from the first four entry-lines: line 3: "Cusp Objects" After the definer(22 33 ) and the double-space that follows, the string of numbers divided by one space each, refer, first to twelfth, to the Cusps, First to Twelfth, and "..set an amount of influences for cusps." ~ so these are values on a scale of 0 to 15, not on/off flags, and "influence" here means 'relative power'. oYj 22 33 10 0 0 0 0 0 0 0 0 0 0 0 ; will switch them off. ------------------------------------------- Three more examples: the last three entry-lines: lines 6, 7, 8: "Powers of Aspects" the -YjA entry, having regard to how powerful an aspect is reckoned. line 7 deals with: Inconj. - SemiSext - semisq. - Sesq. - Quint. - BiQuintile line 8 is for the smaller aspects, in order: SemiQuint. - Sept. - Novile - Binovile - Bisept. - Trisept. - Quadrinovile To switch this last line off, oYjA 12 18 0 0 0 0 0 0 0 0 0 0 0 0 ; that 'o' at the beginning switches them all off. YOUR DEFAULT TRANSIT INFLUENCES ~ two examples, from the four entry-lines: line 1: "Intrinsic-Powers-during-Transit, Major Planets" After this Intrinsic-Power-during-Transit flag -YjT, the range-definer 1 10 refers to first to tenth planets (i.e., Majors_definer 1 10 ); then, after the two spaces, there follows the sequence of flags for ------------------------------------------- line 4: "Influence in transit" this line covers relative 'influences' given to planets when transitting, according to final four factors: YOUR CHART COLOURS ~ three examples, from the five entry-lines: line 1: "Element Colors", - this colours the planets and Luminaries "the numbers after the line-code, each divided by spaces, specify the coIours, first to fourth, of fir(e) objects, then ear(th) objects, air objects, and lastly, wat(er) objects - like Neptune";. - here I have applied the same color (14, = Cyan) to all planets, irrespective of they're regarded as fiery, earthy, airy or watery. ------------------------------------------- line 2: "Aspect Line colors" the numbers after the -YKa 1 18 and a double space, each define the colour for a different kind of aspect-line in turn. ------------------------------------------- line 4: "Main Colors" the numbers (flags) after the -Yk 0 8 and the double-space, are colour-values and, in this particular set-up, make it as follows:oYkC 14 14 14 14 ; switches them off. YOUR DEFAULT GRAPHICS SET-UP ~ four examples, from the nine entry-lines: line 2: "Default X / Y resolution on-screen" (Installed default was 461 x 461). These two numbers should be the same, even though the graphical display is oblong with the info bar included.. There's no dividend in making the numbers not match, if your aim is to distort the window to compensate for the monitor resolution, because Astrolog then defaults to one number or another. ------------------------------------------- line 3: "Bitmap filesize & type" The last 'b' indicates a colour bitmap, - this is no longer a variable. ------------------------------------------- line 6: "Use Actual Fonts" Setting the 0 to 1 will prompt Astrolog to use actual fonts, including Mr. Hirst's Astro font. ------------------------------------------- line 9: "Corner Decoration" the numbers, divided by a single space, refer firstly to whether there's no decoration (0), a moire (1), or a web (the default option, a (2), as here). YOUR DEFAULT DIRECTORIES for FOLDERS ~ two examples of the one typical entry-line, directing to the 'Ephemeris': the two paths differ according to which A32 release you have - line 2: "Ephemeris" This defines version 1.x's default path, where Astrolog32 tracks along and, in this case, is expecting the Swiss Ephemeris folder to be located. <<<< SAVE CONFIG.FILE, & CLOSE >>>> ------------------------------------------- DODGE No. 10 GETTING THE ABSOLUTE PATH FOR YOUR DIRECTORIES:  Open My Computer, and navigate to a folder view that includes where your Astrolog32 is; open the Astrolog32 folder, (where you will find some or all of \atlas, \miscellaneous, \interpretations, \charts, \ephemeris, & \main). Open My Computer, and navigate to a folder view that includes where your Astrolog32 is; open the Astrolog32 folder, (where you will find some or all of \atlas, \miscellaneous, \interpretations, \charts, \ephemeris, & \main).Open a folder, right-click on one file, and select Properties; Find 'location' and insert your cursor left of the 'C:\..' (see image, right). Drag the mouse over the address till it is all highlighted; go Ctrl+c. Paste this 'absolute path' between the inverted commas in the DIRECTORIES lines, for the folder in question. WHY NOT AT THE C: ROOT? Not that the root isn't a fine place for Astrolog32 to work from: rather, that the root is not, for me, a place to put a folder I'm likely to mess with frequently. Folders can be far from the folder holding the program! Here's one way I found to avoid diving to the C: root: cut/paste the \charts folder to a more accessible location - (e.g., Program Files): find & copy the full path to a file within it: open astrolog32.dat, and, among the Config.file directory-paths, find the \charts line; copy/paste the correct path into :DIC "C:\Program Files\charts"!.. and Save Config.file!
Equally good, you can re-write paths in [Settings] > Making a new link to your program, Astrolog32.exe: whether you want a link on your Desktop, in a 'console' folder, or in Start Menu, do this:[Directory Settings], then go [Edit] > [Edit configuration file], and save it. ------------------------------------------- Find the Astrolog32 folder, open \main, and highlight, then right-click astrolog32.EXE: select 'Create shortcut' (this will create a link at the bottom of the list of contents of \main called shortcut to Astrolog32.exe); tile the \main window with the target window, and drag it from the one to the other, or onto the 'Start' button, and it will work. |
 The remaining columns can be prepared automatically in a good text-editor, and inverted commas replaced, using 'Find & Replace' in three passes: the first, to replace
  potential indicators of a dodgy
  A warning with all the foreign-language guides - one keyboard shortcut in these versions of A32 does differ from the one driving chart-animation in our English version: namely, English A32 uses 'p' to animate, all others, 'N'.
 | MS Paint: Paint is likely present on your Windows© pc, and while it has no layering way of working, the 'Paste Transparent' feature allows one mask or image to be embedded onto a chart, or, a chart can be integrated into a large Paint canvas, which can include lists, an aspects grid, - even a biography, given the ability to paste in text in any font. |
| SE Aspectarian.: To avoid moving away from the Astrolog32 window, this freeware will establish when an aspect perfects. The Swiss Ephemeris is used. To avoid duplicating the Swiss Ephemeris, install SE Aspectarian first and expand your ephemeris files to there, as you can steer Astrolog's directories to SE Aspectarian copies, not the other way round. The helpfile hasn't worked for me - just kills the program - but it is straightforward to understand The link here. |
| Irfanview is a famous freeware for handling images, always available here. You can paste bitmaps into it, size them to a given height or width precisely, change colours, and save, in most formats, to any folder. The reducing or enlarging of images can be very clean, and greyscale is available, which is absent from Paint. Charts can be finely rotated, with slight loss of colour. |
| Considered a second install of Astrolog32? A proxy version will only take up 2.6 Mb, as you can you can use the directory fields in the Config file, to send calls for \charts, \ephemeris, and \atlases to the first install. And, this copy can be a smaller size, for making charts to paste into a document; or, with different aspects set to appear, or, running at a time difference. Here's how to put one on the desktop: Create a folder on the desktop, called, say, Proxy. Now open your current Astrolog32 folder, highlight the \main folder, go 'Edit' > 'Copy', and paste it in your new Proxy folder: now right-click this new \main folder, and open 'Properties': put your cursor just left of the C:\.. in Location field, and sweep right to highlight the address: go Ctrl+c. In your new \main in Proxy, locate and open astrolog32.dat in Notepad, go Ctrl+end, and find the first line (:DIM) in DIRECTORIES. Between the inverted commas that follow, highlight the old address, from the left up to (and leaving intact) the final subfolder which is \main, then paste in the folder's address you copied previously. viz: "C:\Documents and Settings\yourname\Desktop\Proxy\main" Save your new astrolog32.dat. Make a shortcut to astrolog32.exe - and put it in ..'Accessories', so as not to overwrite any previous shortcut. DONE. |
.JPG) END of GUIDE
END of GUIDE